Setting up different user accounts allows for each user of the computer to have a personalized desktop/computer setup, and allows the computer administrator to manage the activity of certain users if needed.
To setup the users, we're going to return to the Computer Management Snap-In.
Click Start, right click on Computer and select “Manageâ€
Double click System Tools
Double click Local Users and Groups
Double click Users
You'll notice that there are already a few users on the system that you cannot access. If you notice, on the Administrator and Guest usernames there is a down arrow icon on them. This means that they are disabled currently and cannot be logged into. If you have guests that do not need a permanent account on your machine, you can double click on the Guest account and then uncheck “Account is disabledâ€.
Next, for added security, we're going to set a password to the Administrator account.
Right click on Administrator and select “Set Passwordâ€. Ensure that the password meets the following requirements:
1. Easily remembered, not guessed
2. At least 8 characters in length
3. A combination of letters, numbers, and special characters
It is highly advisable to choose a password that meets the complexity requirements, but at the same time, don't jeopardize forgetting your password!
Now, onto creating new users.
Right click anywhere in the white space of the main window and select “New User…â€
This will launch the new user creation Snap-In. Why do I keep calling these things Snap-In's you ask? Because Microsoft decided that Windows now is a Snap-In machine apparently (according to my college books at least…)
Enter the desired username. You can enter the full name if you please and a short description of the user. My advice would be to leave the “User must change password at next login†so the user can set their own password when they login for the first time. (Don't worry, if you need access to the users account you can change their password by using the “Set Password†function as you did with the Administrator account should the user be a child and you need to login to their desktop for whatever reason)
Once you click Create, the screen will appear to just refresh itself and delete the information you filled out. Fear not as the user was created and it is now onto creating another user if you so desire.
Once you have created all the users you need to. Go ahead and click Close.
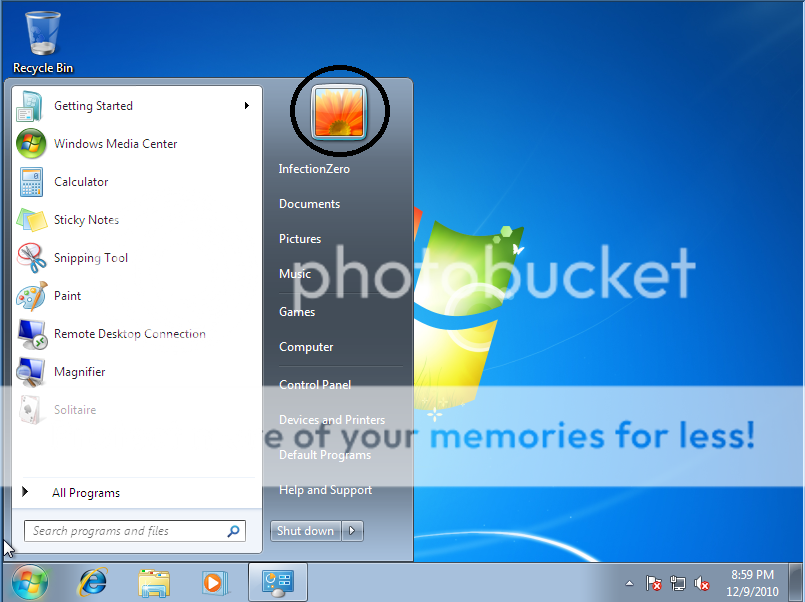
Now in the outline of the tutorial I mentioned that we would take a look at the parental controls. Following these steps, you will also have the ability to make another account as an Administrator if so desired. This is accomplished through the User Accounts Snap-In. To get there, click Start, and then click on your profile picture (as shown below)
Now, select Manage another account.
Select the account you would like to manage.
Changing the account type will allow you to set the user as an Administrator.
Parental Controls
In the same screen, you will be able to manage parental controls for the user by selecting “Set up parental controlsâ€. Now, in Windows 7, there are only a few options under the parental controls. You can set times when the users are allowed and not allowed to use the computer, you can allow or block specific programs from being run by the user, and you can setup the ESRB game rating of which a user can play. (grammar?) You can also choose the games that said user is allowed to play if you wish not to use the rating system, or since some games are not rated anyway.
I'm not going to walk through each individual option but if there prove to be some questions regarding how to setup the parental controls, I can expand if need be.
Setting Password Policies
Before your created users login to the machine, you may want to institute password policies. These control how complex a password can be, how long it may be used for, and several other factors. To access the Password policy settings, we will need to launch the Local Security Policy Snap-In. To do this:
Click Start, in the search field, type “secpol.msc†and press enter.
Double click “Account Policiesâ€
Double click “Password Policyâ€
Now you are presented with the below options:
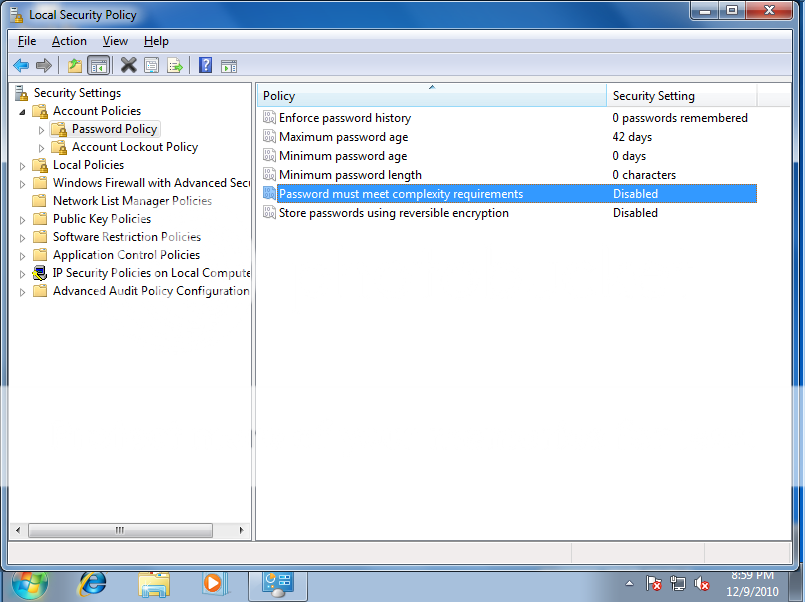
Here's a quick overview of what these options mean.
1. Enforce Password History: If you force a user to change their password every X days, then this setting will prevent them from using the same password over and over again. You set the number of passwords that the system will remember. In many companies, the standard is to remember a years worth of passwords. So this setting may depend on the length of time you allow a user to use a particular password.
2. Maximum Password Age: This determines how old a password can be before the user is required to provide a new password.
3. Minimum Password Age: This will prevent the user from changing their password two days after they were required to change it. For my particular company, this is set to the same number of days (90) as the maximum password age. This allows you to control when passwords are changed and if they need to be reset, then you will be the one resetting.
4. Minimum Password Length: There's no point to having a password that's a single character or even a few characters in length. Setting this to at least 8 is advisable.
5. Password must meet complexity requirements: Double click on this and then click on the “Explain†tab to see a list of the complexity requirements. This prevents users from using dictionary words or the like as passwords to make unauthorized access more difficult.
6. Store passwords using reversible encryption: Do not enable this unless you need to. If you're an average user, you don't need to.
Here, you can mix and match to your personal taste. The more options you setup, the more secure your computer and personal information will be.
To setup the users, we're going to return to the Computer Management Snap-In.
Click Start, right click on Computer and select “Manageâ€
Double click System Tools
Double click Local Users and Groups
Double click Users
You'll notice that there are already a few users on the system that you cannot access. If you notice, on the Administrator and Guest usernames there is a down arrow icon on them. This means that they are disabled currently and cannot be logged into. If you have guests that do not need a permanent account on your machine, you can double click on the Guest account and then uncheck “Account is disabledâ€.
Next, for added security, we're going to set a password to the Administrator account.
Right click on Administrator and select “Set Passwordâ€. Ensure that the password meets the following requirements:
1. Easily remembered, not guessed
2. At least 8 characters in length
3. A combination of letters, numbers, and special characters
It is highly advisable to choose a password that meets the complexity requirements, but at the same time, don't jeopardize forgetting your password!
Now, onto creating new users.
Right click anywhere in the white space of the main window and select “New User…â€
This will launch the new user creation Snap-In. Why do I keep calling these things Snap-In's you ask? Because Microsoft decided that Windows now is a Snap-In machine apparently (according to my college books at least…)
Enter the desired username. You can enter the full name if you please and a short description of the user. My advice would be to leave the “User must change password at next login†so the user can set their own password when they login for the first time. (Don't worry, if you need access to the users account you can change their password by using the “Set Password†function as you did with the Administrator account should the user be a child and you need to login to their desktop for whatever reason)
Once you click Create, the screen will appear to just refresh itself and delete the information you filled out. Fear not as the user was created and it is now onto creating another user if you so desire.
Once you have created all the users you need to. Go ahead and click Close.
Now in the outline of the tutorial I mentioned that we would take a look at the parental controls. Following these steps, you will also have the ability to make another account as an Administrator if so desired. This is accomplished through the User Accounts Snap-In. To get there, click Start, and then click on your profile picture (as shown below)
Now, select Manage another account.
Select the account you would like to manage.
Changing the account type will allow you to set the user as an Administrator.
Parental Controls
In the same screen, you will be able to manage parental controls for the user by selecting “Set up parental controlsâ€. Now, in Windows 7, there are only a few options under the parental controls. You can set times when the users are allowed and not allowed to use the computer, you can allow or block specific programs from being run by the user, and you can setup the ESRB game rating of which a user can play. (grammar?) You can also choose the games that said user is allowed to play if you wish not to use the rating system, or since some games are not rated anyway.
I'm not going to walk through each individual option but if there prove to be some questions regarding how to setup the parental controls, I can expand if need be.
Setting Password Policies
Before your created users login to the machine, you may want to institute password policies. These control how complex a password can be, how long it may be used for, and several other factors. To access the Password policy settings, we will need to launch the Local Security Policy Snap-In. To do this:
Click Start, in the search field, type “secpol.msc†and press enter.
Double click “Account Policiesâ€
Double click “Password Policyâ€
Now you are presented with the below options:
Here's a quick overview of what these options mean.
1. Enforce Password History: If you force a user to change their password every X days, then this setting will prevent them from using the same password over and over again. You set the number of passwords that the system will remember. In many companies, the standard is to remember a years worth of passwords. So this setting may depend on the length of time you allow a user to use a particular password.
2. Maximum Password Age: This determines how old a password can be before the user is required to provide a new password.
3. Minimum Password Age: This will prevent the user from changing their password two days after they were required to change it. For my particular company, this is set to the same number of days (90) as the maximum password age. This allows you to control when passwords are changed and if they need to be reset, then you will be the one resetting.
4. Minimum Password Length: There's no point to having a password that's a single character or even a few characters in length. Setting this to at least 8 is advisable.
5. Password must meet complexity requirements: Double click on this and then click on the “Explain†tab to see a list of the complexity requirements. This prevents users from using dictionary words or the like as passwords to make unauthorized access more difficult.
6. Store passwords using reversible encryption: Do not enable this unless you need to. If you're an average user, you don't need to.
Here, you can mix and match to your personal taste. The more options you setup, the more secure your computer and personal information will be.