Apokalipse
Golden Master
- Messages
- 14,559
- Location
- Melbourne, Australia
7900/7950 GT Voltmod Guide
Voltmodding a 7900/7950 GT can be done to increase the overclock you can achieve. If your 7900/7950 GT has a reference PCB, this mod can be done. There are a few 7900/7950 GTÂ’s that donÂ’t use the reference PCB (I think this includes most of the 512MB versions, I could be wrong)
Disclaimer: Nobody on Tech-Forums.net are responsible if you kill your card. Do this at your own risk.
I recommend that you read this guide carefully, and understand what you are doing before going ahead.
the biggest risk is soldering resistors. If you decide to do the resistor mods, be really careful. If you are not comfortable with soldering, I do not recommend you attempt the resistor mods.
The conductive pen mod is not very risky; however I still advise you be careful.
If you only have stock cooling, I recommend a maximum of about 1.4V
Make sure you have drawn the right traces, and they are not touching any other contacts.
What you need to voltmod:

The areas in the red boxes are the areas you need to look for when voltmodding your card
Conductive Pen mod:
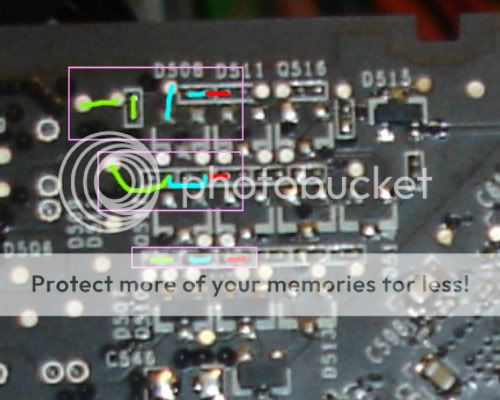
The above picture shows three possible sets of routes you can use to increase voltage (in the pink boxes)
I recommend using the lower set, because it is the easiest to do. But remember to only use one set.

This is another set you can use. I'd recommend it after the set in the bottom pink box.
Green trace: gives +0.05V increase
Blue trace: gives 0.10V increase
Red trace: gives +0.20V increase
You can combine the colours to make different voltages:
7900 GT
1.2V = none (stock)
1.25V = green
1.3V = blue
1.35V = blue + green
1.4V = red
1.45V = red + green
1.5V = red + blue
1.55V = red + green + blue
7950 GT
1.4V = none (stock)
1.45V = green
1.5V = blue
1.55V = blue + green
1.6V = red
1.65V = red + green
1.7V = red + blue
1.75V = red + green + blue
Resistor Mod:
Note: I recommend you use the same style of resistors used on the card in the first place, like IÂ’ve done. They are kinda hard to find, but worth it.
If you cannot find that style of resistor, you can do what I did and steal resistors from old parts you donÂ’t use anymore (Preferably dead. I have several dead Pentium 3 motherboards which I took the resistors from)
Another side note, that style of resistors is very easy to lose. So be careful.
To increase voltage over 1.55V (1.75V for 7950's - though I don't recommend that), you need 1 x 50Kohm resistor (47Kohm will be fine)

In this picture, the highlighted resistors you see are not the ones that came with my card. IÂ’ve already replaced them, but I donÂ’t feel like swapping them back just for the picture
When you get your card, The red resistor measures 5Kohm. By replacing this with a 50Kohm resistor, you increase the voltage by +0.3V (I used a 47Kohm resistor, which I calculated to give a +0.28V increase)
Replacing this resistor alone increases the voltage from 1.2V to 1.5V (or if you use a 47Kohm resistor, 1.48V)
Do this in conjunction with a conductive pen mod to increase the voltage further.
7900 GT
1.5V = resistor
1.55V = resistor + green
1.6V = resistor + blue
1.65V = resistor + blue + green
1.7V = resistor + red
1.75V = resistor + red + green
1.8V = resistor + red + blue
1.85V = resistor + red + green + blue
7950 GT
1.7V = resistor
1.75V = resistor + green
1.8V = resistor + blue
1.85V = resistor + blue + green
1.9V = resistor + red
1.95V = resistor + red + green
2.0V = resistor + red + blue
2.05V = resistor + red + green + blue
I do not recommend going further than about 1.7V. This is with aftermarket cooling.
so for 7950 GT's, I would recommend choosing either the resistor mod, or the conductive pen mod
these cards can get quite hot if you put the voltage high.
In the picture above, the green resistor controls the switching frequency. It measures 86Kohm
By reducing the resistance to 46Kohm, you will increase the switching frequency, and hence the overclockability of your card.
This can be done by doing one of the following:
Note: this resistor can even be taken down to about 30Kohm if your overclocks are not going as high as youÂ’d like
Heatsinking ICÂ’s:
If voltmodding your video card, it is recommended that you use aftermarket cooling for your GPU. Also some of the ICÂ’s will run hotter with a voltmod.
These 3 ICÂ’s in particular can get hot if you go above about 1.55V


If you go to 1.65V and above, the capacitors at the back of the card can also get hot. You might want to sink them too:

I haven't made a memory voltmod section. at least not yet.
though if anybody else wants to make one and post it here, you're more than welcome to do so
Voltmodding a 7900/7950 GT can be done to increase the overclock you can achieve. If your 7900/7950 GT has a reference PCB, this mod can be done. There are a few 7900/7950 GTÂ’s that donÂ’t use the reference PCB (I think this includes most of the 512MB versions, I could be wrong)
Disclaimer: Nobody on Tech-Forums.net are responsible if you kill your card. Do this at your own risk.
I recommend that you read this guide carefully, and understand what you are doing before going ahead.
the biggest risk is soldering resistors. If you decide to do the resistor mods, be really careful. If you are not comfortable with soldering, I do not recommend you attempt the resistor mods.
The conductive pen mod is not very risky; however I still advise you be careful.
If you only have stock cooling, I recommend a maximum of about 1.4V
Make sure you have drawn the right traces, and they are not touching any other contacts.
What you need to voltmod:
- Conductive Pen (highly recommended)
- Soldering Iron (optional, to increase voltage past 1.55V)
- Solder – preferably very thin (to be used with soldering iron)
- Resistors (optional)
- Pencil
The areas in the red boxes are the areas you need to look for when voltmodding your card
Conductive Pen mod:
The above picture shows three possible sets of routes you can use to increase voltage (in the pink boxes)
I recommend using the lower set, because it is the easiest to do. But remember to only use one set.
This is another set you can use. I'd recommend it after the set in the bottom pink box.
Green trace: gives +0.05V increase
Blue trace: gives 0.10V increase
Red trace: gives +0.20V increase
You can combine the colours to make different voltages:
7900 GT
1.2V = none (stock)
1.25V = green
1.3V = blue
1.35V = blue + green
1.4V = red
1.45V = red + green
1.5V = red + blue
1.55V = red + green + blue
7950 GT
1.4V = none (stock)
1.45V = green
1.5V = blue
1.55V = blue + green
1.6V = red
1.65V = red + green
1.7V = red + blue
1.75V = red + green + blue
Resistor Mod:
Note: I recommend you use the same style of resistors used on the card in the first place, like IÂ’ve done. They are kinda hard to find, but worth it.
If you cannot find that style of resistor, you can do what I did and steal resistors from old parts you donÂ’t use anymore (Preferably dead. I have several dead Pentium 3 motherboards which I took the resistors from)
Another side note, that style of resistors is very easy to lose. So be careful.
To increase voltage over 1.55V (1.75V for 7950's - though I don't recommend that), you need 1 x 50Kohm resistor (47Kohm will be fine)
In this picture, the highlighted resistors you see are not the ones that came with my card. IÂ’ve already replaced them, but I donÂ’t feel like swapping them back just for the picture
When you get your card, The red resistor measures 5Kohm. By replacing this with a 50Kohm resistor, you increase the voltage by +0.3V (I used a 47Kohm resistor, which I calculated to give a +0.28V increase)
Replacing this resistor alone increases the voltage from 1.2V to 1.5V (or if you use a 47Kohm resistor, 1.48V)
Do this in conjunction with a conductive pen mod to increase the voltage further.
7900 GT
1.5V = resistor
1.55V = resistor + green
1.6V = resistor + blue
1.65V = resistor + blue + green
1.7V = resistor + red
1.75V = resistor + red + green
1.8V = resistor + red + blue
1.85V = resistor + red + green + blue
7950 GT
1.7V = resistor
1.75V = resistor + green
1.8V = resistor + blue
1.85V = resistor + blue + green
1.9V = resistor + red
1.95V = resistor + red + green
2.0V = resistor + red + blue
2.05V = resistor + red + green + blue
I do not recommend going further than about 1.7V. This is with aftermarket cooling.
so for 7950 GT's, I would recommend choosing either the resistor mod, or the conductive pen mod
these cards can get quite hot if you put the voltage high.
In the picture above, the green resistor controls the switching frequency. It measures 86Kohm
By reducing the resistance to 46Kohm, you will increase the switching frequency, and hence the overclockability of your card.
This can be done by doing one of the following:
- drawing over it with pencil, and measuring the resistance using a multimeter (if you are not comfortable with soldering, you may want to try this)
- soldering a 100Kohm resistor in parallel with it
- replacing the resistor entirely with a 45-47Kohm resistor
Note: this resistor can even be taken down to about 30Kohm if your overclocks are not going as high as youÂ’d like
Heatsinking ICÂ’s:
If voltmodding your video card, it is recommended that you use aftermarket cooling for your GPU. Also some of the ICÂ’s will run hotter with a voltmod.
These 3 ICÂ’s in particular can get hot if you go above about 1.55V
If you go to 1.65V and above, the capacitors at the back of the card can also get hot. You might want to sink them too:
I haven't made a memory voltmod section. at least not yet.
though if anybody else wants to make one and post it here, you're more than welcome to do so
") .
.