Surely you're at least vaguely framiliar with the USB Doomsday Device Hub at Thinkgeek. It's a neat looking box with a sequence of toggles building up to a scary red button. What kind of awesomes could the button possibly do!?

Unfortunately the answer to that is: nothing! It's a 4 port USB hub that makes a cheesy explosion sound effect when you press the button. How disappointing is that? This little trigger box is so solidly built that it deserves some worthy usage. Should it be used as a computers power button, or programmed to launch an application? Could it initiate an emergency shut down, or even trigger a BSoD!? I decided that something had to be done.
I did some research and found a couple of useful sites. First thing was this homemade device on Instructables.com which at least served as great schematic reference. Second thing I found, which ended up being the real deal maker, is this other USB button and some custom software that lets you launch Windows commands and applications. Kudos to Ben Shoof who put that utility together. He has some other interesting stuff on his site too.

So I ordered the Panic Button, downloaded Ben's software, and prepped for surgery. The Panic Button couldn't be simpler inside - USB cord attached to a rather tiny circuit board with a single wired button.
The Doomsday Device on the other hand, has a but more to it. A web of wires connect all 4 toggles to the circuit board (which doubles as the USB hub). It's more than a simple closed loop though, as each switch also routes directly back to the circuit board which seems to take into account the sequence that the switches are toggled in. If you do not activate the switches in numerical order then the red button will not work. The LED is also controlled entirely by the board logic rather than being looped in with the toggles.
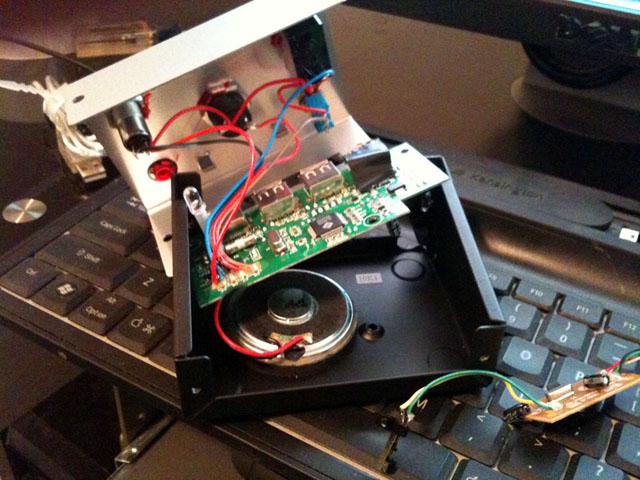
(both device's circuits side by side)
Anyway, I went ahead and just snipped all the wires (and the speaker) from the circuit board because it was just making things too complicated. I'm only interested in the switch hardware at this point. I should note that the USB hub does still operate perfectly on it's own even after I've severed its limbs.
I do not claim to be a master electrician, so I sort of fumbled my way through this re-configuration. I'll also admit to killing a LED in the process, and probably routing power other places it should not have gone while trying to loop in the LED and power source.

With enough tinkering and some compromising, I got the thing all soldered together. Ok so maybe the authenticity of having to toggle all switches in a specific order was lost, and it's true the LED & key-switch are on a separate loop than the rest of the switches. However it's the best I can do with the hardware I currently have, and I think the added software functionality makes it a worthy step beyond the stock Doomsday hub.
The beauty of it (thanks to benshoof.org) is that you can easily set it to do whatever you want. In my case, I am launching a command script to open the task manager.
Perhaps doing something like restarting the computer would be more dramatic, but I guess I chose task manager in reference to CTRL+ALT+DEL which we all know and love so much.

The fully functional USB hub remains inside as well (thus the dual USB cords).
I do hope to take a second look at this project in the future, as I would love to add some authenticity back to the way the key-switch and LED work. In order to do that I'll need to find a different key-switch that accommodates two loops. Perhaps I could also do away with the dual USB cords by wiring the “Panic Button†hardware directly to one of the on-board ports.
For now though, I have other projects coming down the pipe and need to put this one to bed.
Unfortunately the answer to that is: nothing! It's a 4 port USB hub that makes a cheesy explosion sound effect when you press the button. How disappointing is that? This little trigger box is so solidly built that it deserves some worthy usage. Should it be used as a computers power button, or programmed to launch an application? Could it initiate an emergency shut down, or even trigger a BSoD!? I decided that something had to be done.
I did some research and found a couple of useful sites. First thing was this homemade device on Instructables.com which at least served as great schematic reference. Second thing I found, which ended up being the real deal maker, is this other USB button and some custom software that lets you launch Windows commands and applications. Kudos to Ben Shoof who put that utility together. He has some other interesting stuff on his site too.
So I ordered the Panic Button, downloaded Ben's software, and prepped for surgery. The Panic Button couldn't be simpler inside - USB cord attached to a rather tiny circuit board with a single wired button.
The Doomsday Device on the other hand, has a but more to it. A web of wires connect all 4 toggles to the circuit board (which doubles as the USB hub). It's more than a simple closed loop though, as each switch also routes directly back to the circuit board which seems to take into account the sequence that the switches are toggled in. If you do not activate the switches in numerical order then the red button will not work. The LED is also controlled entirely by the board logic rather than being looped in with the toggles.
(both device's circuits side by side)
Anyway, I went ahead and just snipped all the wires (and the speaker) from the circuit board because it was just making things too complicated. I'm only interested in the switch hardware at this point. I should note that the USB hub does still operate perfectly on it's own even after I've severed its limbs.
I do not claim to be a master electrician, so I sort of fumbled my way through this re-configuration. I'll also admit to killing a LED in the process, and probably routing power other places it should not have gone while trying to loop in the LED and power source.
With enough tinkering and some compromising, I got the thing all soldered together. Ok so maybe the authenticity of having to toggle all switches in a specific order was lost, and it's true the LED & key-switch are on a separate loop than the rest of the switches. However it's the best I can do with the hardware I currently have, and I think the added software functionality makes it a worthy step beyond the stock Doomsday hub.
The beauty of it (thanks to benshoof.org) is that you can easily set it to do whatever you want. In my case, I am launching a command script to open the task manager.
Perhaps doing something like restarting the computer would be more dramatic, but I guess I chose task manager in reference to CTRL+ALT+DEL which we all know and love so much.
The fully functional USB hub remains inside as well (thus the dual USB cords).
I do hope to take a second look at this project in the future, as I would love to add some authenticity back to the way the key-switch and LED work. In order to do that I'll need to find a different key-switch that accommodates two loops. Perhaps I could also do away with the dual USB cords by wiring the “Panic Button†hardware directly to one of the on-board ports.
For now though, I have other projects coming down the pipe and need to put this one to bed.
") I'd make it launch an animation of little rockets firing all over the desktop, but that's just me lol
I'd make it launch an animation of little rockets firing all over the desktop, but that's just me lol