I just bought three SY-BIR-IDESA IDE to SATA bidirectional converters to connect my IDE hard drive, CD drive, and dvd drive to the SATA connectors on my new motherboard.
The directions are extremely vague, and the actual setup seemingly tricky. All over the Internet some people report that the adapters work well and immediately, and others couldn't get the things to work no matter what they tried. It is seldom specified what they tried besides the switch in both positions.
I haven't yet turned on the computer for the first time, but if the drives are not recognized a dozen things could potentially be wrong and I want to make sure I have the adapters connected right.
First question. I am still using my old power supply with its molex connectors. Three different staff at the computer parts store told me NOT to use the power connector on the adapter to power my IDE drives, because I have MOLEX connectors and the drives do not draw power from the mother board. SATA drives don't draw power from the mother board either; my power supply also has SATA power connectors. In fact it's hard to see why anyone would power their hard drives with this adapter unless they didn't for instance have the correct plugs for their drives.
Do the adapters need to be plugged into the power supply in order to work, or something? The computer parts staff said no.
What is the consequence of using the power connector if you don't need to?
The instructions don't mention an option of not using the power connectors; why not if you don't need to use them?
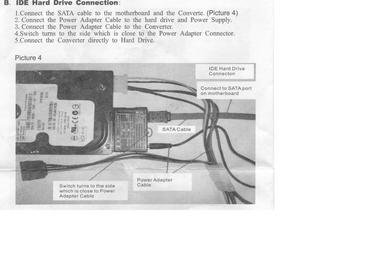
Second question. I know that the directions say to push the switch toward the power plug for my application, but without the pictures showing clearly how to position that switch, it isn't clear to me nor to anyone else on line what you mean. Do you mean to push the upper part of the switch toward the power plug, or to push the lower part of the switch toward the power plug?
Third question. Does each IDE drive need to be set as a master using a jumper? A couple of people said that's when they got the adapter to work, and many people who could not get the adapter to work didn't mention whether the IDE drives were set as master. Of course, the issue is not mentioned in the instructions.
Fourth question. Is the power plug supposed to be pushed all the way in? It won't push all the way in, on any of the three of them. A photo clearly shows it pushed only part way in. The computer parts staff told me it isn't supposed to push all the way in. It is transparently clear that the plug won't necessarily make contact nor stay plugged in since nothing holds it in, since it isn't all the way in and it doesn't snap or get held in. All over the web people are complaining that the plug won't stay in and may not make contact.
Of course, there is only a need to worry about this if I have to power my IDE drives through the converter.
Fifth question. Is there any thing else specific that I need to do to set up the converters propertly that aren't mentioned in the instructions?
Thanks!
.
Dora
The directions are extremely vague, and the actual setup seemingly tricky. All over the Internet some people report that the adapters work well and immediately, and others couldn't get the things to work no matter what they tried. It is seldom specified what they tried besides the switch in both positions.
I haven't yet turned on the computer for the first time, but if the drives are not recognized a dozen things could potentially be wrong and I want to make sure I have the adapters connected right.
First question. I am still using my old power supply with its molex connectors. Three different staff at the computer parts store told me NOT to use the power connector on the adapter to power my IDE drives, because I have MOLEX connectors and the drives do not draw power from the mother board. SATA drives don't draw power from the mother board either; my power supply also has SATA power connectors. In fact it's hard to see why anyone would power their hard drives with this adapter unless they didn't for instance have the correct plugs for their drives.
Do the adapters need to be plugged into the power supply in order to work, or something? The computer parts staff said no.
What is the consequence of using the power connector if you don't need to?
The instructions don't mention an option of not using the power connectors; why not if you don't need to use them?
Second question. I know that the directions say to push the switch toward the power plug for my application, but without the pictures showing clearly how to position that switch, it isn't clear to me nor to anyone else on line what you mean. Do you mean to push the upper part of the switch toward the power plug, or to push the lower part of the switch toward the power plug?
Third question. Does each IDE drive need to be set as a master using a jumper? A couple of people said that's when they got the adapter to work, and many people who could not get the adapter to work didn't mention whether the IDE drives were set as master. Of course, the issue is not mentioned in the instructions.
Fourth question. Is the power plug supposed to be pushed all the way in? It won't push all the way in, on any of the three of them. A photo clearly shows it pushed only part way in. The computer parts staff told me it isn't supposed to push all the way in. It is transparently clear that the plug won't necessarily make contact nor stay plugged in since nothing holds it in, since it isn't all the way in and it doesn't snap or get held in. All over the web people are complaining that the plug won't stay in and may not make contact.
Of course, there is only a need to worry about this if I have to power my IDE drives through the converter.
Fifth question. Is there any thing else specific that I need to do to set up the converters propertly that aren't mentioned in the instructions?
Thanks!
.
Dora