Corsair Hydro Seriesâ„¢ H70 - CWCH70
By: Dan Durland
Introduction
Corsair has long been known as a leading manufacturer of high-speed memory modules and in recent years they have expanded into the Flash Memory, Cooling and Power Supply markets as well. It is the recent expansion into the cooling market that we'll be looking into today, namely the Hydro Series H70.
The H70 is designed for high-performance computing and overclocking. It takes the best features of its predecessor, the H50, and combines them with a few improvements of its own. The most noticeable difference, from the H50, is its dual fan configuration with a much larger radiator unit sandwiched between them. The new radiator design is almost twice as thick as the original giving it a higher heat-exchanging capacity. Another major improvement comes with the re-design of the pump/cold-plate heat exchanging unit. This new unit has a low-profile pump with swivel hoses for easier assembly and a less obtrusive footprint.
Features
- AMD AM2/AM3, Intel 775, 1156, 1366 Compatibility
- 120 x 50mm Radiator
- High Performance Copper Cold Plate
- Low Profile Pump Unit
- Push-Pull 120mm Fans
- Sealed Unit. No Maintenance.
Specifications
- Radiator Dimensions - 120 x 50mm
- Fan Dimensions - 120 x 25mm (per fan)
- Fan Speeds - 1600 or 2000 RPM
- Air Flow - 50.35 - 61.2 CFM
- Static Pressure - 1.8 - 2.3mm H2O (per fan)
- Noise Level - 26 - 31.5 dBA (per fan)
Packaging
The H70 is packaged in a 10.5"x8.5"x5.5" cardboard box with the specifications and features listed on the sides. Inside the box we find the H70 securely placed in a pre-formed cardboard tray.
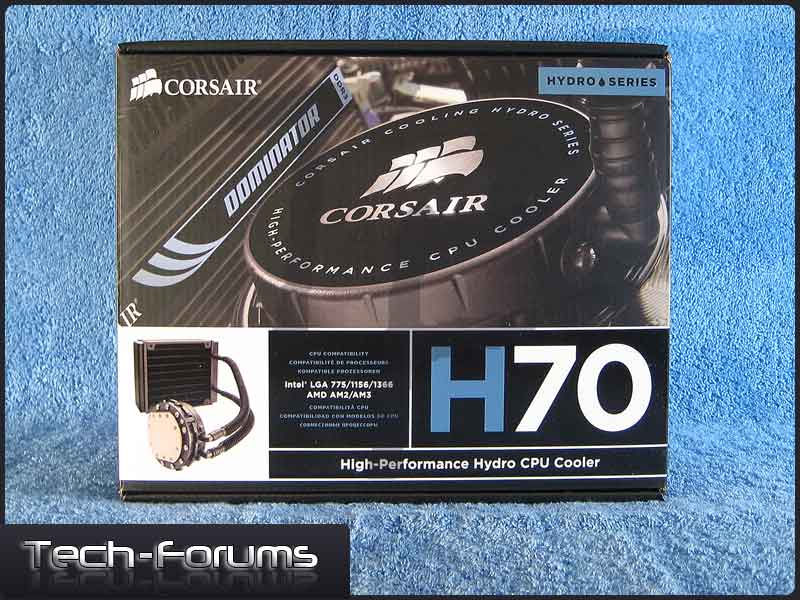

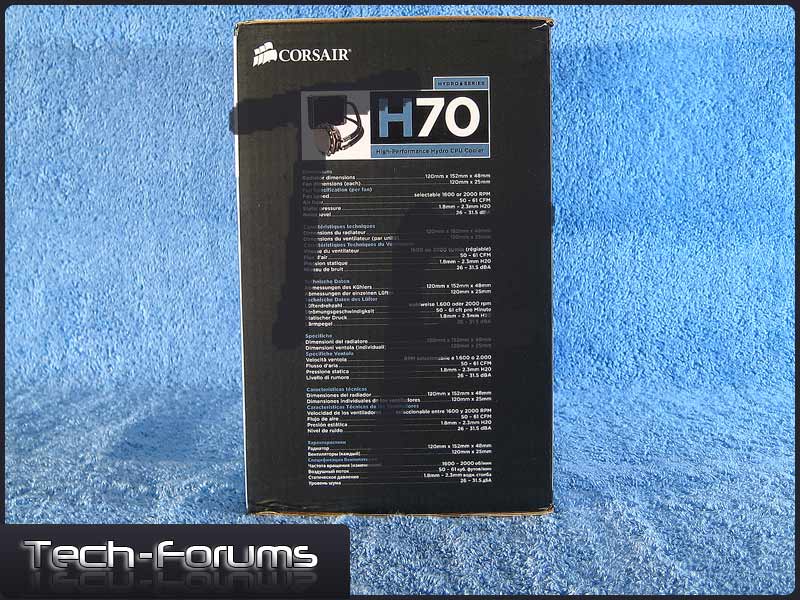


Image Gallery
Here are all the components of the H70 laid out for your viewing pleasure.

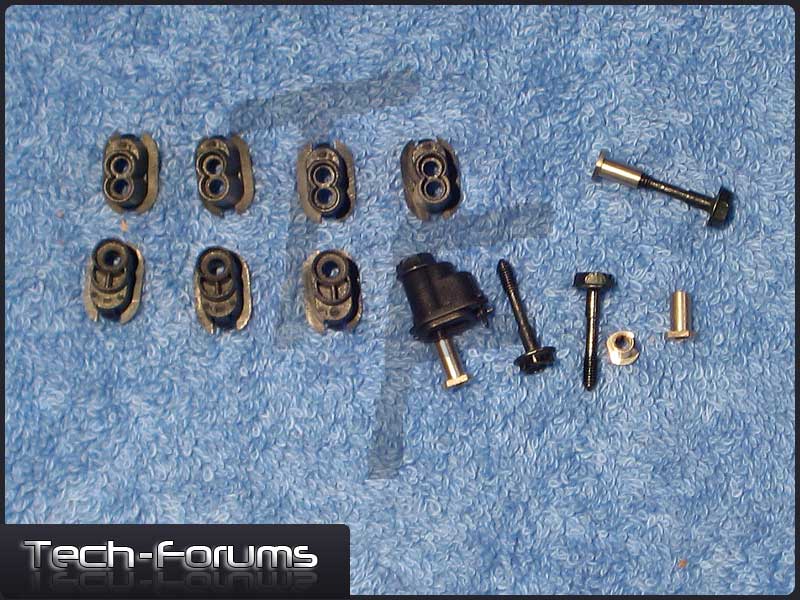
In the 1st picture we see the retention brackets as well as all of the included hardware. In the 2nd picture we have a close up of the retention bracket spacers, there are two styles of spacers so you must choose the correct spacer for your socket type.

Here we have the fans, fan screws and the fan wiring cables. The Y cable is used to power both fans through a single fan header. The other two individual cables are 7v resistor cables which are used to reduce the fan speed down to 1600 RPM if desired.

In these next two images we can see the radiator assembly and a close up of the cold-plate that comes pre-applied with thermal paste. I would like to note that the thermal paste is thicker than I would like it to be and I don't know what brand of paste it is. But I won't be changing the paste for this review, the average user will use it "as is" so that's how I'm going to use it also.


Installation
For the installation procedure I highly recommend reviewing the included assembly instructions.


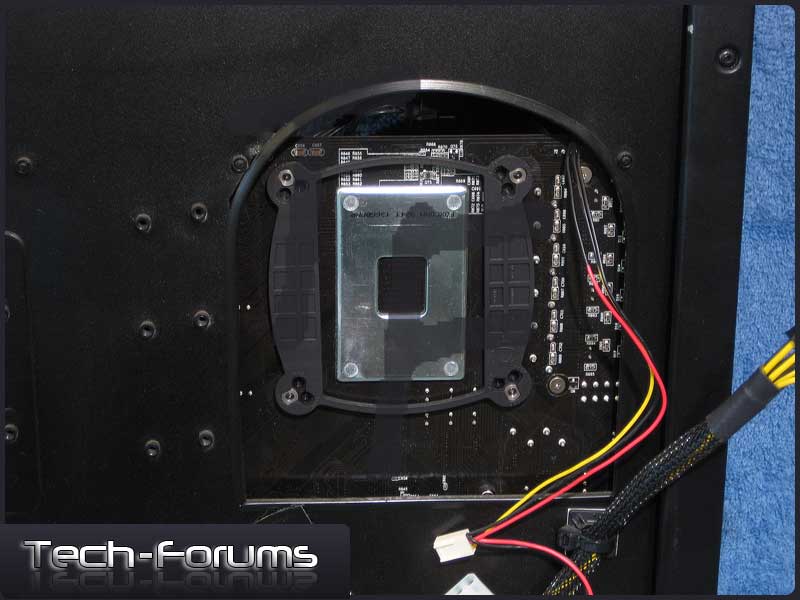
The installation of the H70 is a fairly easy process if your case has an access hole to the back of the motherboard. After choosing the correct backplate and ring assembly for my cpu socket I loosely installed them to the motherboard. Later, this loose assembly of the retention bracket will allow you to attach the H70 pump/cold plate to the cpu without smearing the pre-applied thermal paste.

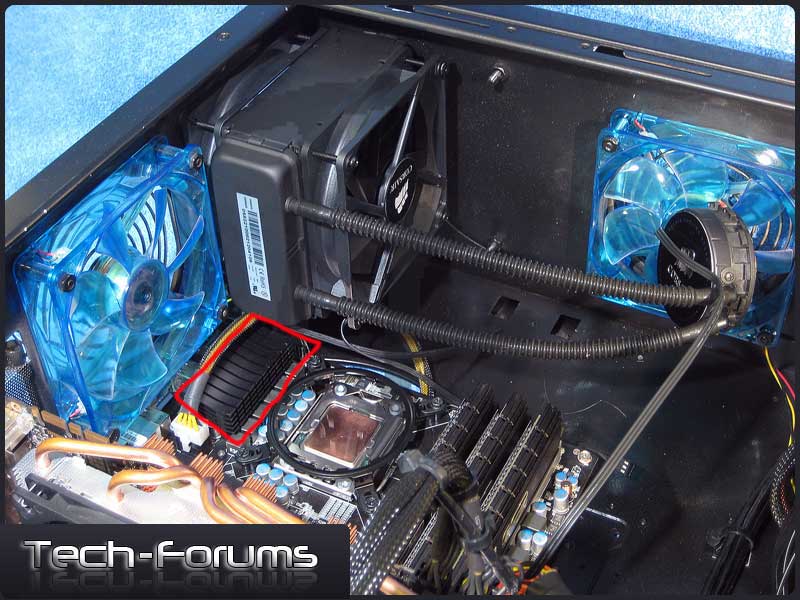
Once the retention bracket is in place it is time to install the fans and radiator assembly. The fan and radiator assembly is designed to be installed in place of the cases rear exhaust fan. My case has two rear exhaust fans which gave me the option to place the H70 above my motherboard mosfets heatsink (circled in red in the image below). If your mosfet heatsink is covered by the H70 then you should consider aiming a fan at it, I'm surprised Corsair hasn't designed a fan shroud to duct air towards the mosfets heatsink. I would also like to mention that I have the fans setup to pull cool air from outside of the case, this is Corsair's recommended configuration.
Once the radiator/fan assembly is installed you can finally attach the pump/cold-plate to the cpu and firmly tighten the retention bracket to the motherboard.
My case requires a fan guard at the rear exhaust fans but the included fan screws were not quite long enough. This shouldn't be a problem for most users as the majority of cases have the fan grill built-in.

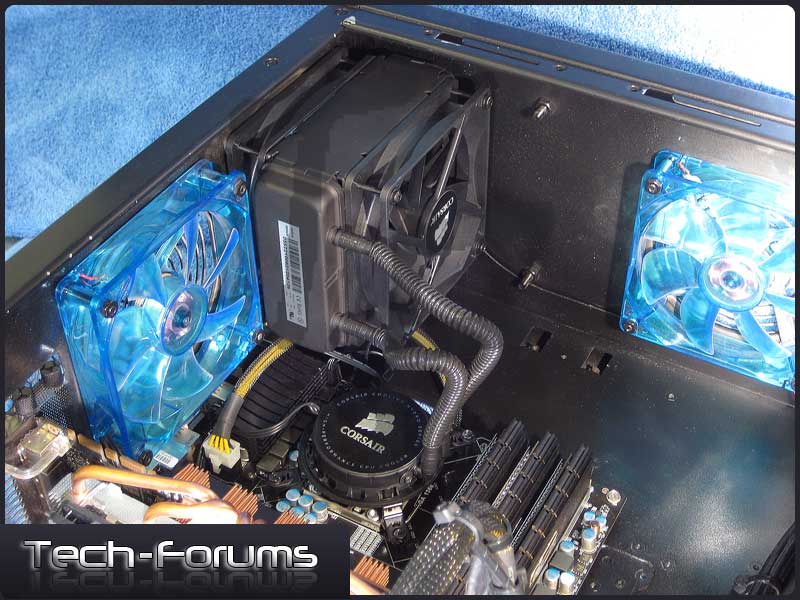
My final picture shows the fully functional H70 installed in my case with the side panel attached.

Testing
Test System
- Intel i7 920 D0
- EVGA E757 SLI LE
- 12 GB OCZ DDR3 1600 (6x2GB)
- EVGA GTX 280
- Corsair 750w PS
- Agility 2 SSD (OS)
- Seagate 250 GB HDD (Data, Page File)
- Lite-On Blu-ray
- Cooler Master Stacker 810
- Corsair Hydro H70 - Noctua NH-D14
I will be testing the Corsair H70 against the Noctua NH-D14 with the i7 920 at the stock speed of 2.66 GHz and overclocked to 4 Ghz. The H70 will be tested just as it comes out of the box. No special thermal paste, no lapping of the cold plate, no fan modifications and the NH-D14 is being treated exactly the same. You will also notice that I did not test the H70 at 4GHz with the fans set to 1600 RPM. While the temperatures may be at an acceptable level for some, I do not recommend or condone them as such.
- The stock speed tests at 2.66 GHz will be conducted with all the bios setting at default with the following changes.
- Turbo Mode Disabled
- CxE Function Disabled
- Intel SpeedStep Disabled
- with VDroop
- DIMM Voltage @ 1.65v
- Memory Latencies @ 7-7-7-24-54-1T
- The overclocked speed tests at 4.0 GHz will be conducts with the following bios setting changes.
- Turbo Mode Disabled
- CxE Function Disabled
- Intel SpeedStep Disabled
- without VDroop
- CPU VCore @ 1.3125v
- CPU PLL @ 1.725v
- DIMM Voltage @ 1.65v
- QPI PLL @ 1.3v
- IOH VCore @1.375v
- IOH/ICH I/O Voltage @ 1.625v
- ICH VCore @ 1.3v
- CPU Host Frequency @ 200 MHz
- Memory Frequency @ 1067 MHz (2:8)
- Memory Latencies @ 7-7-7-24-54-1T
Testing Software and Procedure
- Prime95 v.25.11 64-bit (In-place large FFT's)
- LinX 0.6.4 64-bit (ALL memory selected)
- Real Temp 3.40 (Logging enabled)
Prime95 will be run for (1) one hour followed by a 30 minute idle period. Idle and Load temperatures will be shown as an average in a variety of configurations.
- Average of all 4 cores combined
- Delta T average of all 4 cores combined (core temp. minus the ambient temp.)
- Individual average of all 4 cores
- Delta T individual average of all 4 cores (core temp. minus the ambient temp.)
LinX will be ran for 50 minutes followed by a 30 minute idle period. Idle and Load temperatures will be shown as an average in a variety of configurations.
- Average of all 4 cores combined
- Delta T average of all 4 cores combined (core temp. minus the ambient temp.)
- Individual average of all 4 cores
- Delta T individual average of all 4 cores (core temp. minus the ambient temp.)
Test Results
Prime95


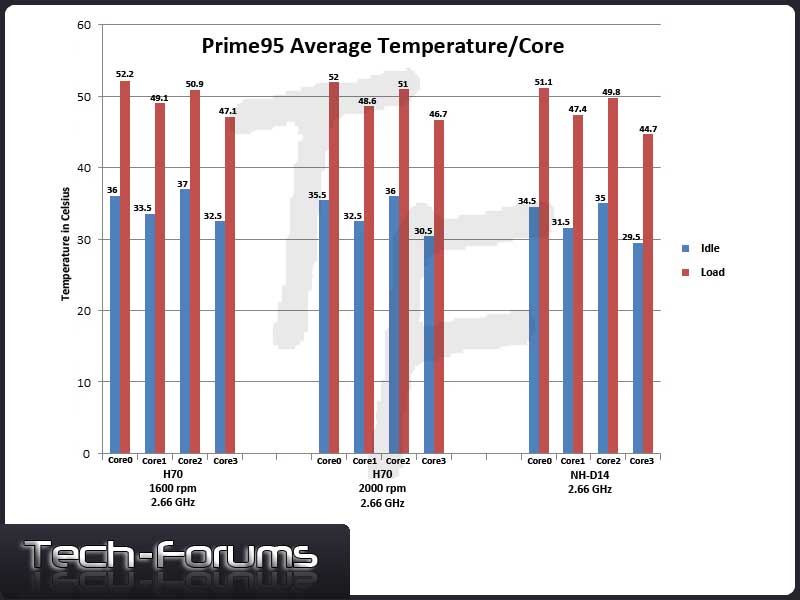
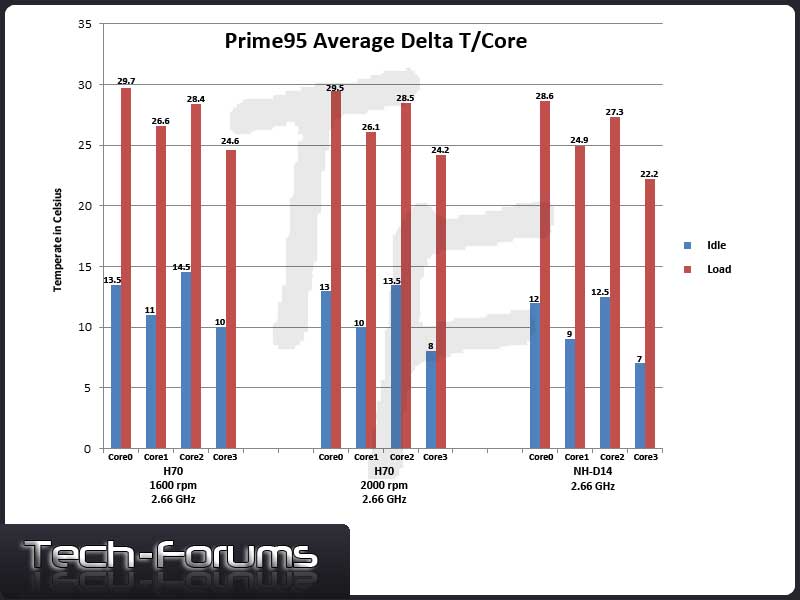
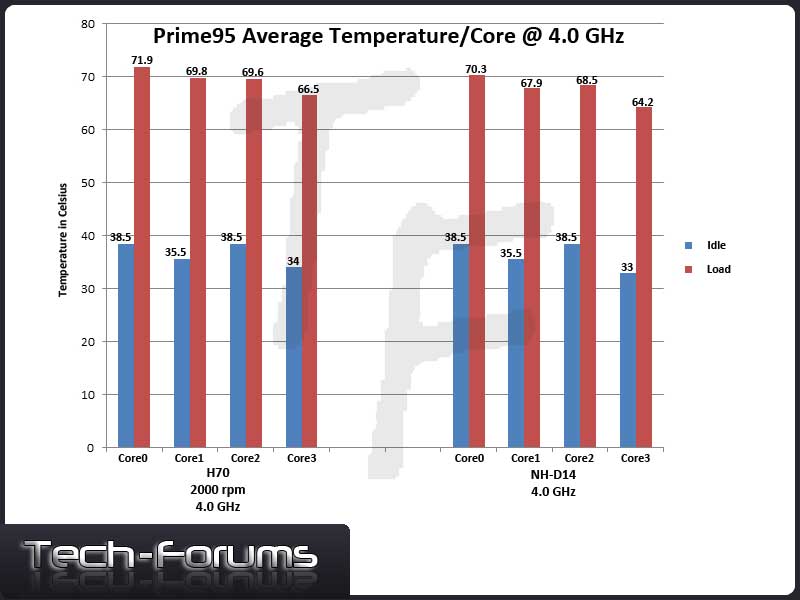

After completing this first round of testing we see the H70 lagging ever so slightly behind the Noctua NH-D14. But I have to say the Noctua NH-D14 is, in my opinion, the very best "straight out of the box" air-cooling heatsink that money can buy and the H70 is doing a great job of keeping up.
LinX


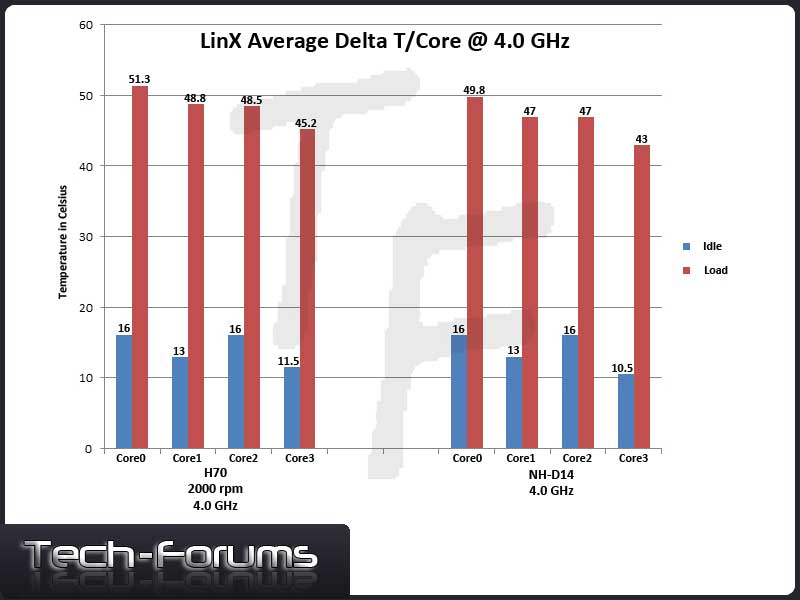
After running through my LinX testing we once again see the H70 lagging slightly behind the Noctua Nh-D14.
Benchmark Conclusions
Looking at the numbers, the H70 finishes in 2nd place. However, considering the setup that bested it was one of the most advanced "straight out of the box" coolers money can buy, the H70 kept pace admirably well. I also think the very small difference in the test numbers could be attributed to the thick layer of thermal paste that was applied to the H70 at the factory. Yes, I could've easily cleaned that paste off and applied my own, but I didn't. And yet the H70 still easily overclocked my i7 920 to 4Ghz, all while keeping the cores at very good temperatures.
Considering I tested the H70 from the perspective of a novice, I have to say that it exceeded my expectations and I'm very pleased with the results.
Noise Levels
- Ambient Noise Level - 38 dBA
- Noctua NH-D14 - 44 dBA
- H70 at 1600 rpm - 44 dBA
- H70 at 2000 rpm - 54 dBA
Pros
- Compatible with all Modern CPU's
- Enthusiast Performance
- Improved Design
- Swivel Hoses
- Less Obtrusive than a Heatsink
- Silent Operation with the Fans at 1600 rpm
- Maintenance Free
Cons
- Expensive
- Noisy with the Fans at 2000 rpm
- Provides no Ventilation to the Motherboard
Final Thoughts and Rating
For a self-contained water cooling kit I have to say that I am impressed, the H70 is everything the H50 wasn't. Is it perfect? No, but what is? The H70 can currently be found priced at approximately $100 US, this is more than a comparable heatsink but well less than a custom water-cooling loop. If you're looking for a sexy, enthusiast-level water-cooling solution that you can install without all the usual hassle, then the Corsair Hydro Seriesâ„¢ H70 is just what you're looking for. I'm awarding it 4 out of 5 stars.

I would like to thank Corsair for allowing Tech-Forums to conduct this review and I look forward to evaluating more Corsair products in the future.
