solidsteve
Daemon Poster
- Messages
- 600
hey every body i've seen a few people saying about upgradeing there ps3 hard drive here so i thourght i would post my guide i made a few months back
Enjoy
Section 1
Tools needed for the task
Section 2
General information
The ps3 hard drive is not the hardest thing to find in the world all you need to be looking out for is just your bog standard laptop hard drive as long as it has a SATA port on it your away
The Original hard drive that comes with the ps3 system is the speed of 5200RPM, i would recomend one of the same speed but you are able to put 72--RPM and 4200RPM hard drives into the ps3 system
Section 3
Upgradeing the Hard Drive
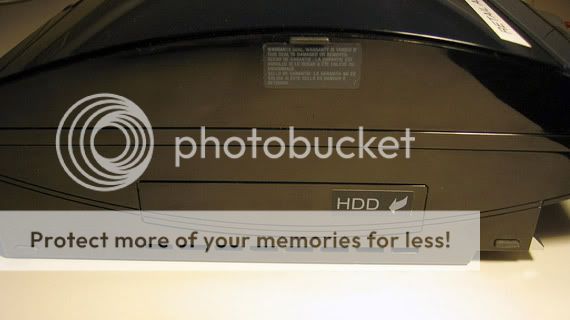
For the first step of upgrading you will need to remove the plastic cover protecting the drive bay that holds the ps3 in place, do not be worried as this is easily done with a flat headed screw driver.
Just push the screw driver into the little space on the right hand side of the bay and leaver it out all done.
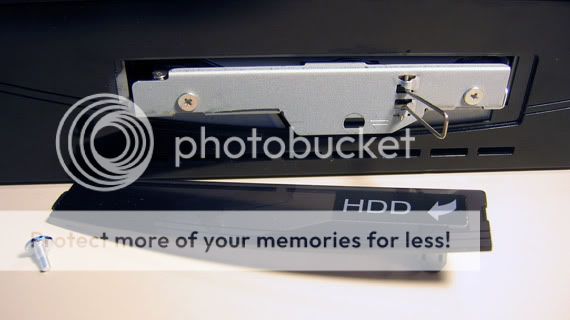
Now where rolling, now you should be faced with the hard drive tray just simply take the cross headed screw driver and remove the blue screw.
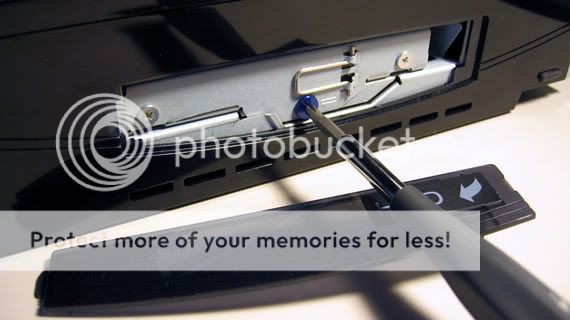
Now to remove the hard drive.
Just flip up the leaver, move the hard drive to the right and then pull it out.
Now to take the hard drive off the tray and replace it, for this you will need the cross headed screw driver again.
Basically remove all 4 screws and slide out the hard drive.

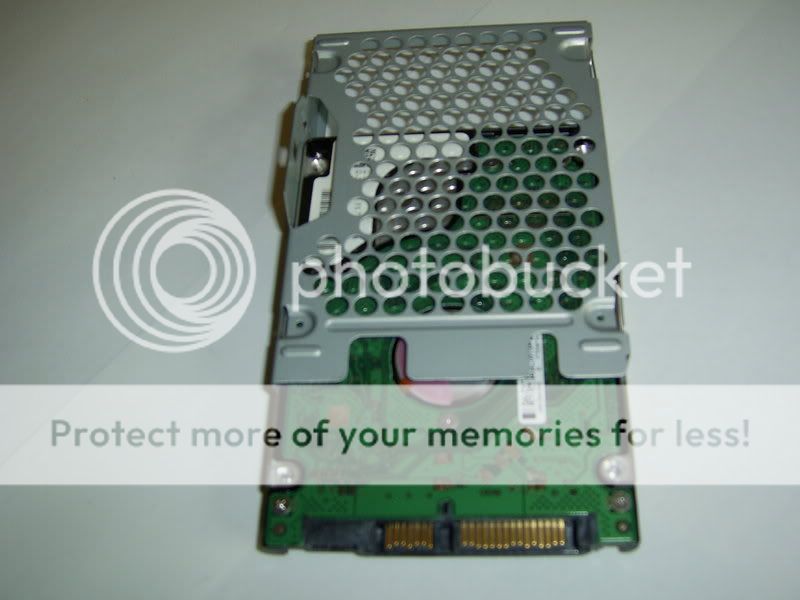
For the last part all you need to do is slide in the new hard drive into the hard drive tray then do these steps in reverse as in put all the screws into the hard drive tray, put the tray into the bay and slide it to the left then replace the blue screw and bay cover.
Now all that is left is to turn on the system and format the hard drive.
I'm not going to tell you how to do this because there is an on screen guide though out the whole thing.
Section 4
BACKING UP AND RESTORYING YOUR PlayStation 3 hard drive
1. Have an extra mass storage device ready (like a external HDD). This will be used to store the back-up image the PlayStation 3 will be creating, we'll call this "back-up drive" to avoid confusion. This shouldn't be the new hard drive you are planning to install on the PlayStation 3!!!.
Make sure that the back-up drive has enough free space to back-up your current PlayStation 3 hard drive. If you have, say for example, a 60gb hdd on the PlayStation 3, you may prefer to grab something at least 80gb. Format the back-up drive to have a FAT32 file system. If the file system is different than FAT32, the PlayStation may not recognize the back-up drive. You can use any hard drive enclosure to connect your back-up drive to the USB slot of the PlayStation
2. Once you have the back-up drive ready, insert it to one of the USB slots of the PlayStation 3. Check to see if the back-up drive is properly connected. If the back-up drive is not visible on any of the XMB menus, then it probably has a different file system and/or there is a problem with the hardware itself.
3. From the XMB, go to "Settings->System Settings->Backup Utility". Select "Back Up". The system will prompt you about some warnings. After that, select your back-up drive then the PlayStation 3 will start creating an image of its current hard drive.
4. Once the backing up is done, disconnect the back-up drive from the PlayStation 3, then perform the how to swap hard drive instructions.
5. After installing the new hard drive, re-connect the back-up drive to the PlayStation 3.
6. From the XMB, go "Settings->System Settings->Backup Utility". Select "Restore". Select the back-up drive, then select the back-up file(the back-up file is named by ddmmyytttt(Not sure right now, will verify), which indicates the day(dd), month(mm), year(yy), and time(tttt) on when the back-up was created. The PlayStation 3 will format the new drive and restart. It will ask you to press the PS button from the controller and will start restoring the hard drive.
7. Once done, remove the back-up drive, reset the PlayStation 3, and there you go, you upgraded your hard drive while keeping all the previous files your old hard drive has.
Section 5
Extra information
Video Guides
YouTube - PlayStation 3 Hard Drive Upgrade (HOWTO)
YouTube - Gamehelper: PS3 HDD Replacement
Links to infomation i used in this guide
Press Start: How to Upgrade Your PlayStation 3 Hard Drive - Features at GameSpot
Upgrading Your PS3 Hard Drive for More Storage Space - How to Upgrade Your PS3 Hard Drive
Re: Upgrading my PS3 Harddrive ***UPDATE*** - PLAYSTATION®3 Media - PlayStation.com Forums
Upsize your PS3 hard drive - Tips & Tricks - CNET Asia
1 Photo of ps3 with bigger hard drive inside it

Hard drives that can be used inside the ps3
250GB Fujitsu 2.5in Laptop SATA - 8MB - 5400rpm - Aria Technology
Toshiba 320GB 5400RPM SATA-II 8MB Cache - OEM (MK3252GSX)
Toshiba 200GB 2.5 inch 4200rpm 8Mb Cache SATA II - MK2035GSS - www.microdirect.co.uk
Enjoy
##############################
#####Playstation 3 HDD Updrade Guide#####
##############################
#####Playstation 3 HDD Updrade Guide#####
##############################
Section 1
Tools needed for the task
- 1x Flat head screw driver
- 1x Cross headed screw driver
- 1x Laptop HDD of any size or speed
- and about 20 mins of free time
Section 2
General information
The ps3 hard drive is not the hardest thing to find in the world all you need to be looking out for is just your bog standard laptop hard drive as long as it has a SATA port on it your away
The Original hard drive that comes with the ps3 system is the speed of 5200RPM, i would recomend one of the same speed but you are able to put 72--RPM and 4200RPM hard drives into the ps3 system
Section 3
Upgradeing the Hard Drive
For the first step of upgrading you will need to remove the plastic cover protecting the drive bay that holds the ps3 in place, do not be worried as this is easily done with a flat headed screw driver.
Just push the screw driver into the little space on the right hand side of the bay and leaver it out all done.
Now where rolling, now you should be faced with the hard drive tray just simply take the cross headed screw driver and remove the blue screw.
Now to remove the hard drive.
Just flip up the leaver, move the hard drive to the right and then pull it out.
Now to take the hard drive off the tray and replace it, for this you will need the cross headed screw driver again.
Basically remove all 4 screws and slide out the hard drive.
For the last part all you need to do is slide in the new hard drive into the hard drive tray then do these steps in reverse as in put all the screws into the hard drive tray, put the tray into the bay and slide it to the left then replace the blue screw and bay cover.
Now all that is left is to turn on the system and format the hard drive.
I'm not going to tell you how to do this because there is an on screen guide though out the whole thing.
Section 4
BACKING UP AND RESTORYING YOUR PlayStation 3 hard drive
1. Have an extra mass storage device ready (like a external HDD). This will be used to store the back-up image the PlayStation 3 will be creating, we'll call this "back-up drive" to avoid confusion. This shouldn't be the new hard drive you are planning to install on the PlayStation 3!!!.
Make sure that the back-up drive has enough free space to back-up your current PlayStation 3 hard drive. If you have, say for example, a 60gb hdd on the PlayStation 3, you may prefer to grab something at least 80gb. Format the back-up drive to have a FAT32 file system. If the file system is different than FAT32, the PlayStation may not recognize the back-up drive. You can use any hard drive enclosure to connect your back-up drive to the USB slot of the PlayStation
2. Once you have the back-up drive ready, insert it to one of the USB slots of the PlayStation 3. Check to see if the back-up drive is properly connected. If the back-up drive is not visible on any of the XMB menus, then it probably has a different file system and/or there is a problem with the hardware itself.
3. From the XMB, go to "Settings->System Settings->Backup Utility". Select "Back Up". The system will prompt you about some warnings. After that, select your back-up drive then the PlayStation 3 will start creating an image of its current hard drive.
4. Once the backing up is done, disconnect the back-up drive from the PlayStation 3, then perform the how to swap hard drive instructions.
5. After installing the new hard drive, re-connect the back-up drive to the PlayStation 3.
6. From the XMB, go "Settings->System Settings->Backup Utility". Select "Restore". Select the back-up drive, then select the back-up file(the back-up file is named by ddmmyytttt(Not sure right now, will verify), which indicates the day(dd), month(mm), year(yy), and time(tttt) on when the back-up was created. The PlayStation 3 will format the new drive and restart. It will ask you to press the PS button from the controller and will start restoring the hard drive.
7. Once done, remove the back-up drive, reset the PlayStation 3, and there you go, you upgraded your hard drive while keeping all the previous files your old hard drive has.
Section 5
Extra information
Video Guides
YouTube - PlayStation 3 Hard Drive Upgrade (HOWTO)
YouTube - Gamehelper: PS3 HDD Replacement
Links to infomation i used in this guide
Press Start: How to Upgrade Your PlayStation 3 Hard Drive - Features at GameSpot
Upgrading Your PS3 Hard Drive for More Storage Space - How to Upgrade Your PS3 Hard Drive
Re: Upgrading my PS3 Harddrive ***UPDATE*** - PLAYSTATION®3 Media - PlayStation.com Forums
Upsize your PS3 hard drive - Tips & Tricks - CNET Asia
1 Photo of ps3 with bigger hard drive inside it
Hard drives that can be used inside the ps3
250GB Fujitsu 2.5in Laptop SATA - 8MB - 5400rpm - Aria Technology
Toshiba 320GB 5400RPM SATA-II 8MB Cache - OEM (MK3252GSX)
Toshiba 200GB 2.5 inch 4200rpm 8Mb Cache SATA II - MK2035GSS - www.microdirect.co.uk
More still to come
