Build Log: BIL-Blue

Status
Not open for further replies.
Ok, on to the window. Every computer needs a window, but I'm not a fan of the standard square window when it can be avoided. Anyways, chopped it up and used some extra perf sheet metal I had lying around from past projects:
Picture027.jpg


pre:
Picture005.jpg


post:
Picture023.jpg


Picture024.jpg
 
I really like the looks of Modders Mesh, are you going to paint those pieces or leave them silver? What are you going to use for the center section? The honeycomb mesh has better air flow and it doesn't reduce the visibility like the round mesh. I think it would match up good with the round mesh in the corners. Maybe two-tone the mesh to match the two-tone case feet.

I hate adding comments to peoples work logs as I'm sure you already know what you want, but for some reason I feel compelled to comment. I guess that means I must want to Mod another case to.

Comment as much as you want....where there are no comments I never know if people are reading liking/hating the log.

As for suggested ideas; fire away! I have in my head what I'm planning on doing but if a better idea comes up from others then for sure I'll go with that.

My tentative plans for the mesh is to paint it white to match the interior of the case. The exterior will all be a metallic blue and then the white to accent it and keep the two tone theme going. There will be silver toggle switches for the fans and silver bulgin switches on the front for the power/reset/dvd, I did think of polishing the aluminum to make it match but I think that will be too much silver. As for the center: a big plexy window to see the guts! I like the honeycomb mesh as well but I'm all out and I have these off cuts of the round I can use for free. Free FTW!

I am enjoying this mod quiet well... Just one question, how did you get such good cuts on the rounded corners?

All cuts were made with a dremel and the following cut off wheels:

Picture010.jpg


They cost more but are quick and easy to switch and wear a lot slower. I find I acutally spend less in the long run than the cheaper thin cut off discs.

As in the photo above I always use painters tape to first outline the cut I want to make on the INSIDE of the case. I NEVER cut on the outside so that if the dremels slips or skips it doesn't gouge the good side. For the round edges I angle the disc so that it's actually cutting a crescent shape cut instead of a straight line. I match the crescent cut with the curve of the window and slowly grind inwards towards the off cut area. Once I'm through I use a sanding drum on the dremel to ensure it's all smooth and flows together. I use a file on the straight edges. Let me know if you want more info on that, I could toss a few photos together.
 
Photos would be nice, I have a good dremel, always used reinforced cut off wheels on mine when cutting metal, those 20 packs of small discs don't last long, at all.
 
Photos would be nice, I have a good dremel, always used reinforced cut off wheels on mine when cutting metal, those 20 packs of small discs don't last long, at all.

Alright, as requested a quick run through on cutting round edges with a dremel. I grabbed a thick piece of scrap steel I had lying around, the tutorial will work better with a thicker piece. Don't forget your safety glasses!

003.jpg


So once you have your cut marked off I always start by scoring the line with the dremel. Hold the drill on an angle so that the disc makes a slight crescent shape cut. Keep it on an angle and keep going around the corner, a more shallow angle will give you a large crescent cut vs a steeper angle that leaves less disc in contact with the cutting surface. The sharper your corner the less disc you're going to want touching the surface and therefore the steeper the angle you're going to want to maintain.

007.jpg


After a minute or two you should have something like this:

010.jpg


You can see that I'm working into the corner from the scrap side, by grinding into the cut it lets me keep that disc at the angle I need it to be at to maintain that crescent shape cut for the round edge. The thicker the material the more you are going to need to grind away to get that disc into the deeper sections of the cut. I hope that makes sense.

See the difference here where I'm making a straight cut? The disc is help pretty much perpendicular to the materials.

014.jpg


Here I am again, well into the cut, note the angle of the disc which makes a nice big crescent cut. However, to get it at that angle I had to gring a lot of that scrap side off to get the disc in there.

015.jpg


Eventually the cut will be done, voila! You can see on the scrap cut off where I ground in at an angle.

020-1.jpg


Next I swap the disc for a sanding drum and do the very fine last bit of sanding to make that round corner perfect.

024.jpg


Touch up and last burs with a file and you should be good to go:

027.jpg


If I flip the cut over with the tape removed you can see that the cut doesn't look so clean on this side, in fact if you look at the outside edge which is a cut I did a while ago you can see a couple of spots where the dremel skipped out of the cut and scuffed the surface. That's why you always cut on the off side.

028.jpg
 
Ok, so the plan is to stealth the dvd drive so you wouldn't even know it's there. I cut and sanded down a front 5.25 bay drive cover that will need to be painted but in order to get the drive to open with the front switch I need to re-wire it.

Open up the drive and find the two leads for the front open/close button:
Computers275.jpg


Make sure there is room to run the wires out the back, you may have to cut out some room:

Computers288.jpg


Then solder the two leads with the extensions:

Computers279.jpg


I tacked the wires in place with some hot glue so that if they ever get a hard tug they won't break off their solder.

Computers293.jpg


Now tuck them back under the circuit board and out the back:

Computers289.jpg


Computers290.jpg


Now put the cover back on and the wires should slip out the back for me to attach to the front switch. When it's all done and connected to the front switch I'll post some final pics of it working.
 
So as I mentioned above, I've used those exhaust intakes for front panels but I wish they were a little larger to accommodate the full size of the fan blades. Figured I'd see if I could come up with my own solution to the problem.

Using some spare 3/4' plywood I had lying around I cut two 120mm circles out:

Picture015.jpg


Then glued them together and sanded them smooth and to size on my belt sander. I screwed them to another scarp piece of plywood as a base. I tacked the 1' piece of plexy in place with a screw and using a heat gun tried bending it around the circle:

Picture018.jpg


Picture017.jpg


FAIL! So the heat gun just doesn't work evenly enough to get a consistent circle around the entire piece. Next try is in the oven...shhhh, don't tell the wife:

Picture030.jpg


Then use a belt to wrap it around the wood and hold it in place while it cools.

Picture033.jpg


Amazingly it worked really well, with just one little bulge at the point where the two ends meet:

Picture035.jpg


Now just repeat for the 80mm fan hole.

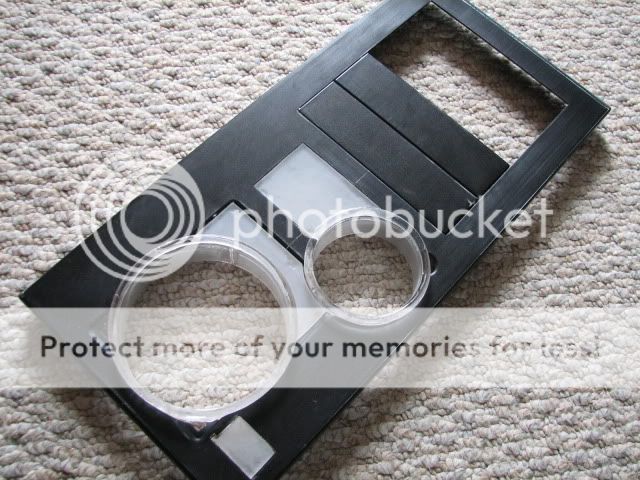
So that takes care of the tunnel component but I want a raised bevel to the fans, not a flush mount to the front. Since I have the wood jigs I just repeated the above process with some acrylic tubing and once cooled glued it to the ends of the two cylinders I just made:

Picture053.jpg


Picture058.jpg


So they don't look too bad for a 1st go at it. However, they aren't perfect, the round tubing is slightly narrower than the tunnel part. To fix this I simply put it on my drum sander and sanded them flush together, you can see it a bit in the photo if you look at the inner edge of the rim:

Picture062.jpg


You see the gap as well? All that will disappear when I apply the short strand fibreglass and will smooth out with sanding. You'll never even know it's two pieces when I'm done.....or atleast that's the plan.

Picture050.jpg


Tack them in place with some adhesive and next is the fibreglass!
 
Short strand time! Picked this up from the local Crappy Tire.

Computers107.jpg


Unfortunately I somehow screwed up the photos of the first application an d can't seem to find them. Here is what it looked like after the second coat was applied:

Oct2010262.jpg


Oct2010264.jpg


Then sanded down:

Oct2010099-1.jpg


Oct2010102.jpg


It's still pretty rough, you can see the coarse grit swirls in the aluminum from the heavy grit, you can also see a number of pot holes and other blemishes in the finishes:

Oct2010103.jpg


Oct2010104.jpg


Here is what it looks like from behind. I'll have to do at least another two coats to smooth out those holes and finish the bevel the way I want it to look.

Oct2010370.jpg
 
Status
Not open for further replies.
Back
Top Bottom