Spud1200
Fully Optimized
- Messages
- 2,556
- Location
- England, UK
I have started this Thread without a title as I'm goeing to explaine how to assemble a PC from my own experience and thus being how I would Construct a New Build.
Their has got to be 101 ways of being able to Assemble a PC but for the Novices of that of tech-forums, as their seem to be endless problems with Power Failures, Unresponcive First Builds ect, I will talk you threw how to Construct a New Build Step By Step as the way I would.
So for the New Build, and I mean useing only Beir Bones of the System, and makeing sure everything is in Working order. You will need to start off with.
1. Motherboard
2. PSU
3. Memory.
4. CPU & Heatsink & Fan.
What you should have is the Following tools and acsessorys.
1. Screwdriver set.
2. PSU Tester.
----------
So based on what you have Purchased and what you have in your Tool Kit, this is how Start. Take the Motherboard and keeping it on a flat suraface, say you are working via a desk in the Liveing Room. You need to install the CPU, makeing sure the Chip (Brain) of the Build is correctly alligned with the Socket. Wich is the acutall part of the motherbord that will sit the Brain of the Computer. Alot of CPU's will have the Pins built in the Chip but alot will have the Pins theese days Built via the Motherboard, so with that in mind you have to correctly alighn the CPU, and thus secureing the Leaver along side the Socket to secure it in place.
Next you need to refer to your users manual for the Heat Sink and Fan, makeing sure you have correctly aligned the Heatsink with that of the mortherboard to secure it in Place. As I'm aware, AMD & Intel have different methords of doing this so refer to the motherbord Manuel for Instructions.
After you have the Heatsink and Fan inplace with the CPU, I all ways install 1 DIMM via the Memory Slots on the Motherboard, wether it be 1GB or that of 2GB, stick with the one stick for the time being. Before you acuutally Install the PSU, check with a Tester, and make sure all the Rails and Voltages are ok. I have one here at Home wich I use and will indicate via Red and Green LEDs if, "Good" & "Bad".
With the Power surply presumably running and working fine, conect this to the motherboard, and the 4 Pin Conector wich is normally in the center of the Motherboard, to give the CPU, and Heatsink & Fan Power.
If you are Building your own PC, you are not going to be doing it with out a Monitor, wether D-Sub (VGA) or HDMI, so the next stage in the construction of the New System is to Conect the video sorce out put makeing sure you have power to the Monitor or TV.
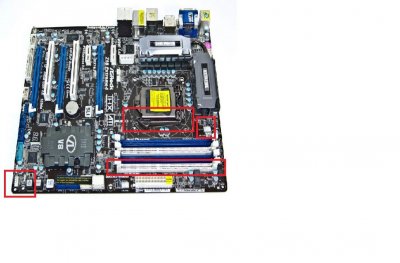
Take a Look at this Picture:
View attachment 5172
Do you see the Pins on the Motherbord, if you use a Screwdriver to jumpstart the Power with the Video Sorce conected via the back panel you should get a Post. You will be presented by the Infomation of the system Specifications, such as Memory Installed Primery Drives and Secoondrey ect.
What you will have to do is use a Resistive touch Screwdriver to conect the Two Pins in order to give the Motherbord power from the PSU, and with all the Components Installed it will POST.
Now that you have a Succsefull POST, disasemble after checking the BIOS and that you are happy with the working components of the System, and install them with in the Case of your Choice. Makeing sure you have everything fully screwed in place, such as the standoffs for the Motherbord in the rite place, conjoining with the Bord.
Once everything is Installed in the case you can add fans, HDD, Optical Drives, makeing sure in older System you have the Master, Slave, in the correct order for the IDE Cable. I think on SATA, drives its Automatic but never built a System useing sata, only IDE. And since moveing over to Laptops primaerily now, have not had the opertunity.
Once you have the HDD (Hard Disk Drive) Installed with an optical Drive, via my experience IDE or you case mabie SATA, you will after being securely in place in the Build, via the corect fixtures with the nessesery DATA calbles have a Compleat system.
Next Boot the System, and make sure everything is regestering in the BIOS, such as the HDD, Optical Drive, and the motherbord is working Fine, such as Temps Voltages, and if you need to set user and, Admin passwords.
Like I seid their are 101 ways of Building a System so if I have missed anything out, then other users of tech-forums will add to the Tutorial and be adble to advise.
Also you should alow 2 - 4 Hours to Build a New Stsem useing the Methord above, for Fauls if any arise and being verry methodical, and takeing time to enjoy the Prosess as its not a Hobby everone can do.
Their some some things I have left out for, but if you can add them in responce to the Post as a tutorial.
Its all Knowelege.
Their has got to be 101 ways of being able to Assemble a PC but for the Novices of that of tech-forums, as their seem to be endless problems with Power Failures, Unresponcive First Builds ect, I will talk you threw how to Construct a New Build Step By Step as the way I would.
So for the New Build, and I mean useing only Beir Bones of the System, and makeing sure everything is in Working order. You will need to start off with.
1. Motherboard
2. PSU
3. Memory.
4. CPU & Heatsink & Fan.
What you should have is the Following tools and acsessorys.
1. Screwdriver set.
2. PSU Tester.
----------
So based on what you have Purchased and what you have in your Tool Kit, this is how Start. Take the Motherboard and keeping it on a flat suraface, say you are working via a desk in the Liveing Room. You need to install the CPU, makeing sure the Chip (Brain) of the Build is correctly alligned with the Socket. Wich is the acutall part of the motherbord that will sit the Brain of the Computer. Alot of CPU's will have the Pins built in the Chip but alot will have the Pins theese days Built via the Motherboard, so with that in mind you have to correctly alighn the CPU, and thus secureing the Leaver along side the Socket to secure it in place.
Next you need to refer to your users manual for the Heat Sink and Fan, makeing sure you have correctly aligned the Heatsink with that of the mortherboard to secure it in Place. As I'm aware, AMD & Intel have different methords of doing this so refer to the motherbord Manuel for Instructions.
After you have the Heatsink and Fan inplace with the CPU, I all ways install 1 DIMM via the Memory Slots on the Motherboard, wether it be 1GB or that of 2GB, stick with the one stick for the time being. Before you acuutally Install the PSU, check with a Tester, and make sure all the Rails and Voltages are ok. I have one here at Home wich I use and will indicate via Red and Green LEDs if, "Good" & "Bad".
With the Power surply presumably running and working fine, conect this to the motherboard, and the 4 Pin Conector wich is normally in the center of the Motherboard, to give the CPU, and Heatsink & Fan Power.
If you are Building your own PC, you are not going to be doing it with out a Monitor, wether D-Sub (VGA) or HDMI, so the next stage in the construction of the New System is to Conect the video sorce out put makeing sure you have power to the Monitor or TV.
Take a Look at this Picture:
View attachment 5172
Do you see the Pins on the Motherbord, if you use a Screwdriver to jumpstart the Power with the Video Sorce conected via the back panel you should get a Post. You will be presented by the Infomation of the system Specifications, such as Memory Installed Primery Drives and Secoondrey ect.
What you will have to do is use a Resistive touch Screwdriver to conect the Two Pins in order to give the Motherbord power from the PSU, and with all the Components Installed it will POST.
Now that you have a Succsefull POST, disasemble after checking the BIOS and that you are happy with the working components of the System, and install them with in the Case of your Choice. Makeing sure you have everything fully screwed in place, such as the standoffs for the Motherbord in the rite place, conjoining with the Bord.
Once everything is Installed in the case you can add fans, HDD, Optical Drives, makeing sure in older System you have the Master, Slave, in the correct order for the IDE Cable. I think on SATA, drives its Automatic but never built a System useing sata, only IDE. And since moveing over to Laptops primaerily now, have not had the opertunity.
Once you have the HDD (Hard Disk Drive) Installed with an optical Drive, via my experience IDE or you case mabie SATA, you will after being securely in place in the Build, via the corect fixtures with the nessesery DATA calbles have a Compleat system.
Next Boot the System, and make sure everything is regestering in the BIOS, such as the HDD, Optical Drive, and the motherbord is working Fine, such as Temps Voltages, and if you need to set user and, Admin passwords.
Like I seid their are 101 ways of Building a System so if I have missed anything out, then other users of tech-forums will add to the Tutorial and be adble to advise.
Also you should alow 2 - 4 Hours to Build a New Stsem useing the Methord above, for Fauls if any arise and being verry methodical, and takeing time to enjoy the Prosess as its not a Hobby everone can do.
Their some some things I have left out for, but if you can add them in responce to the Post as a tutorial.
Its all Knowelege.
 ) , bits just don't make sense, etc. It's actually making it difficult to read at some points. While I'm sure everything in there is fine, when writing a guide (or anything designed to explain/instruct) good communication is very important