Now the reason for this is simple. The format used on Vista/Win7 setup DVD is only a quick format and it is junk. It is like sending your data to the recycle bin and not clearing it out of there. So when you go to install again, you can easily still have issues. Using GParted is much faster and far better than a quick format and it is done in about the same amount of time.
STEP 1:
To start go to the page and download the latest ISO of the program. From there use ImgBurn, or any other program that can burn ISO's directly, to burn the ISO to a CD. Do not extract the ISO as this will not allow the CD to be bootable. Which is the most important aspect of the software.
After that restart your PC with the newly created GParted Live CD in the tray. Upon a restart the software should start up automatically. If it does not and goes directly to Windows you need to check your BIOS boot configuration to make sure that it is set to boot from your Optical Drive first before your hard drive. Each BIOS is different and varies on how this is done so check the manufacturer's website for specific instructions on this.
After you get the boot menu you should select the Default Mode. If that doesn't work try one of the older Modes till you find the mode that works for you. Not every system is the same so the Default settings might not work for you. It looks like this:

After that you will see a bunch of words scrolling in regards to what is loading. You should be prompted to select your keyboard layout and language. Hitting Enter should select USA and English respectively. The program should list the others for you if you choose not to use this setup.
Step 2:
After that the Main Screen comes up:

In the upper right hand corner is a drop down menu to select the different hard drives you have installed. This is for physical hard drives installed. Not for partitions on a hard drive! So if you only have a single hard drive installed, this option should be greyed out for you. So if you are not trying to mess with the hard drive selected, use the drop down menu to select the proper drive.
If it is on the drive you want, you will see that it lists the partitions on the drive. Again still going off of this image. It shows you how the drive is split up and it shows different colors for different formats. Green is usually NTFS, Blue for EXT2 and so on.
The image below is great. It shows you all the different colors for each type of partition. It can do everything from FAT32 to HFS+. So this program can be used by Linux users as well as Windows users and OS X users.
Step 3:
If you wish to delete that partition just right click, select delete. This will then show the drive as RAW partition. But note at this point the changes have not been made!
To create a partition in RAW space just right click and select Create. Now right click on the drive and select the option Format To:

Now if you wish to just enlarge or shrink a partition you will see this screen:

The Space Preceding and Space Following aspect is something you need to know about. This allows you to easily create space before or after the partition you are creating at this time. So if you are trying to make multiple partitions just make sure to use the appropriate selection for preceding or following to create space there. Remember that real hard drive space is done in allocations of 1024MB. So if you are trying to create a partition 4GB is size it will be 4096Mb not 4000MB. Easy way to figure this out, just use a calculator and multiple 1024 by the amount of GB you wish to create. In my example 4GB is = to 1024 X 4.
Now this will create the partition. It will still be in RAW format at this point. You have to right click on the newly created partition and select the option Format To, again as seen above.
For Windows you should be using NTFS. It is far superior and far more secure than FAT32. FAT32 is used for systems like OS X that want to dual boot with Windows but still be able to access the data in both Operating Systems. I would suggest to find alternative methods to use NTFS and HFS+ in the opposite OS's though. OS X has software available to read NTFS and there is some software out there to access OS X's HFS+ partitions.
For Linux users, if you are a first timer EXT2 is the best bet as it is, as far as i know, the most widely used and supported format by all Linux distributions. but read more about what format the distribution you are going to use can support as you may wish to use a different format.
STEP 4:
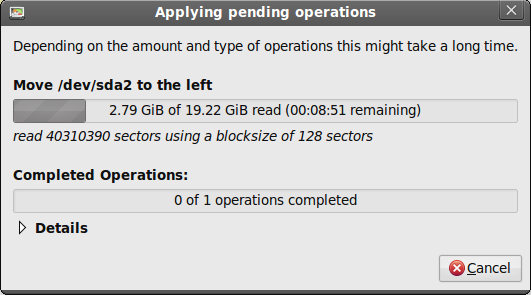
Now after you have created all of your partitions and got everything setup the way you want, you have to remember to click the Apply button.
This is where you will see screen shots below:
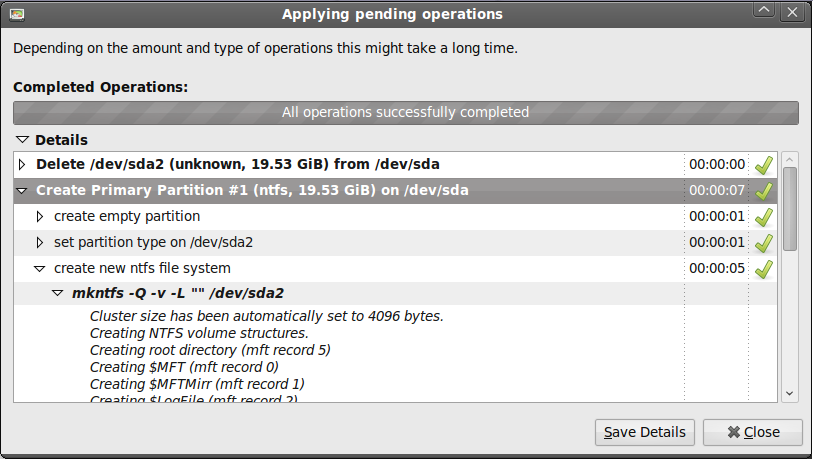
After is says Done is the process fully complete.
CONCLUSION:
Now some people will ask about the Manage Flags aspect. This is only used if you are removing a OS from a multi boot system. Like removing Vista from your Vista/Win7 setup. It is only used in certain cases where after removing the OS you find that you cant boot. So this aspect of the software should be avoided unless you are advised to use it for a specific problem with your boot. At install of your OS of choice it should set up the flags accordingly.
AFTER THOUGHTS:
I hope that this helps people with the use of Gparted. It is a far superior tool for formatting. Yes it is a Linux based program, but can be used for all systems. If you have a question, comment or wish to add something, please make sure to post. Thank you for reading this long thread.
STEP 1:
To start go to the page and download the latest ISO of the program. From there use ImgBurn, or any other program that can burn ISO's directly, to burn the ISO to a CD. Do not extract the ISO as this will not allow the CD to be bootable. Which is the most important aspect of the software.
After that restart your PC with the newly created GParted Live CD in the tray. Upon a restart the software should start up automatically. If it does not and goes directly to Windows you need to check your BIOS boot configuration to make sure that it is set to boot from your Optical Drive first before your hard drive. Each BIOS is different and varies on how this is done so check the manufacturer's website for specific instructions on this.
After you get the boot menu you should select the Default Mode. If that doesn't work try one of the older Modes till you find the mode that works for you. Not every system is the same so the Default settings might not work for you. It looks like this:
After that you will see a bunch of words scrolling in regards to what is loading. You should be prompted to select your keyboard layout and language. Hitting Enter should select USA and English respectively. The program should list the others for you if you choose not to use this setup.
Step 2:
After that the Main Screen comes up:
In the upper right hand corner is a drop down menu to select the different hard drives you have installed. This is for physical hard drives installed. Not for partitions on a hard drive! So if you only have a single hard drive installed, this option should be greyed out for you. So if you are not trying to mess with the hard drive selected, use the drop down menu to select the proper drive.
If it is on the drive you want, you will see that it lists the partitions on the drive. Again still going off of this image. It shows you how the drive is split up and it shows different colors for different formats. Green is usually NTFS, Blue for EXT2 and so on.
The image below is great. It shows you all the different colors for each type of partition. It can do everything from FAT32 to HFS+. So this program can be used by Linux users as well as Windows users and OS X users.
Step 3:
If you wish to delete that partition just right click, select delete. This will then show the drive as RAW partition. But note at this point the changes have not been made!
To create a partition in RAW space just right click and select Create. Now right click on the drive and select the option Format To:
Now if you wish to just enlarge or shrink a partition you will see this screen:
The Space Preceding and Space Following aspect is something you need to know about. This allows you to easily create space before or after the partition you are creating at this time. So if you are trying to make multiple partitions just make sure to use the appropriate selection for preceding or following to create space there. Remember that real hard drive space is done in allocations of 1024MB. So if you are trying to create a partition 4GB is size it will be 4096Mb not 4000MB. Easy way to figure this out, just use a calculator and multiple 1024 by the amount of GB you wish to create. In my example 4GB is = to 1024 X 4.
Now this will create the partition. It will still be in RAW format at this point. You have to right click on the newly created partition and select the option Format To, again as seen above.
For Windows you should be using NTFS. It is far superior and far more secure than FAT32. FAT32 is used for systems like OS X that want to dual boot with Windows but still be able to access the data in both Operating Systems. I would suggest to find alternative methods to use NTFS and HFS+ in the opposite OS's though. OS X has software available to read NTFS and there is some software out there to access OS X's HFS+ partitions.
For Linux users, if you are a first timer EXT2 is the best bet as it is, as far as i know, the most widely used and supported format by all Linux distributions. but read more about what format the distribution you are going to use can support as you may wish to use a different format.
STEP 4:
Now after you have created all of your partitions and got everything setup the way you want, you have to remember to click the Apply button.
This is where you will see screen shots below:
After is says Done is the process fully complete.
CONCLUSION:
Now some people will ask about the Manage Flags aspect. This is only used if you are removing a OS from a multi boot system. Like removing Vista from your Vista/Win7 setup. It is only used in certain cases where after removing the OS you find that you cant boot. So this aspect of the software should be avoided unless you are advised to use it for a specific problem with your boot. At install of your OS of choice it should set up the flags accordingly.
AFTER THOUGHTS:
I hope that this helps people with the use of Gparted. It is a far superior tool for formatting. Yes it is a Linux based program, but can be used for all systems. If you have a question, comment or wish to add something, please make sure to post. Thank you for reading this long thread.
") . Thanks Mak, looks good.
. Thanks Mak, looks good.