And it begins, New Build: Project HAFshell

Status
Not open for further replies.
Ok... figured I'd update my build.. I ended up redoing the loop, goal being the shortest cleanest loop possible, with room for a second loop for the GPUs... I feel I have done that.. will be posting pics as soon as I can steal my girlfriends D60... I switched to UV blue tubing, ordered a blue fan to replace the red one, and some UV lights... also painted the 5.25" bay holder clip things gloss blue, they look pretty slick.

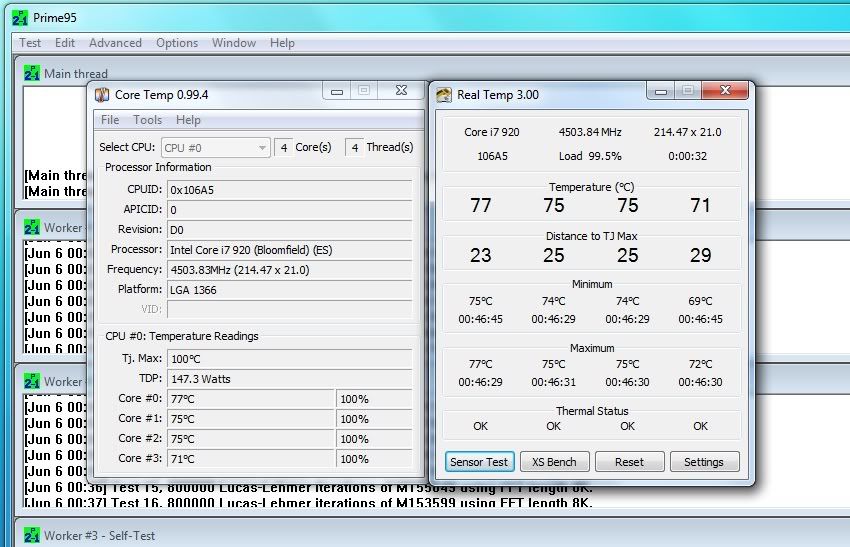
I have some serious finishing touches to do, but for now the loop is working and hardware is in.

Currently prime95 small FFT stable @ 4.5ghz - with turbo on and HT off.. I don't use many programs that would benefit from HT, so I figure why not leave it off and have a higher bclock? pretty sure vcore is at 1.37 or something along those lines.. been up the past 5 hours getting the clock stable and I don't feel like looking at the moment...

But I know, this means nothing without pics, so I will have some uploaded tomorrow night... screenshots too, once I load some programs on here to resize em...
 
Can't wait to see pics! And some superpi runs too!

If you upload to imageshack or anything like that, it will resize the pics for you.
 
I completely forgot about imageshack/pbucket... hmm...

load.jpg

screenshot-1.jpg


idle is 42-48*C ... so about 45.5 avg... load is max of 78*C but about 75 avg on all cores... I know the max recommendation is 80 for these.. so i figure I have it about as far as I'd like to go... 4.5ghz is plenty for me... I willl mess around with voltages, see if I can find the perfect mix... also ambient is very warm in my house probably 80-82*F \

EDIT: and before someone says anything about my prime run.. I did it for about 5 hours last night, temps never rose above 78.. just pulled it up for the screenshots right now... so I'm not claiming it is stable for 30 seconds only lol... I know one of you would have said it... :)

EDIT2: Build Pics

Test fitting
100_1963.jpg

100_1964.jpg

100_1966.jpg

100_1969.jpg

100_1971.jpg

100_1972.jpg


Completed pics to come ASAP...
 
Yea... drain line.. fill line is near the res. inside drive bay.

As for clamps, the worm drives I had were practically impossible to get to work in the positions I was using... after reading a ton on XS.org i decided zip ties would work... unless there is a different type of clamp?

Oh and pic was before adding coolant or zip ties...

The metal worm clamps? :/ I have mine in every single possible position for my loop with no problems... what do you mean?
Zip ties work fine though.

Aspire will correct me if I am wrong, but I believe that having the reservoir at the bottom of the loop isn't really "bad", it's just not very good :p Because having it at the highest point in your loop allows you to bleed your loop the best. But I assume you had no problems bleeding it since you got SS up. :)

That looks sexy... and nice 4.5ghz on that 920! Stable too!
Hot ****, your making me wanna get an i7 ughhh....
And I respect a dude who has nice high clocks and doesn't afraid of* temps with water :p
*meme
Good job :)

(You going to update your sig rig?)
 
The metal worm clamps? :/ I have mine in every single possible position for my loop with no problems... what do you mean?
Zip ties work fine though.

What I really meant (while trying to avoid sounding like an idiot..) that I did not realize you must slide them on prior to attaching the tubes... lol and it was okay because the zip ties are much less noticeable...

That looks sexy... and nice 4.5ghz on that 920! Stable too!
Hot ****, your making me wanna get an i7 ughhh....
And I respect a dude who has nice high clocks and doesn't afraid of* temps with water :p
*meme
Good job :)

(You going to update your sig rig?)

thank you, and yes.. i need to update it.. but not until its FULLY complete :) still have a blue fan and some other stuff to do.
 
Nice clean loop. Looks good. (High Praise from Me)

Your one picture isn't rotated and make it look like you res/pump are lying on there side at th top of the case which kind of confused the **** out of me. But after looking at the other pics, realized the picture just hadn't been rotated.
 
yea.. didnt catch that until after uploading... will try to fix when I get home...

and thank you for the praise... feels good to be done with it, although now I have to tear it apart AGAIN!, there is a tiny droplet (ball point pen tip sized) forming at the base of where the fitting meets the cpu block... never gets larger, never drops, but it is there and it bothers me... weird thing is, I tested it for 24hrs and never saw anything... until now...

I am taking the d60 home, will have pics of the final build ASAP...

hey aspire...the inlet and outlet tube touch right where they bend downward... this shouldn't be a problem should it?

EDIT: Wanted to add a special thanks to ASPIRE, if it had not been for his help/advice putting together it would have been a ton harder and not nearly as clean.. so thanks :)
 
Status
Not open for further replies.
Back
Top Bottom