windows

Status
Not open for further replies.

saltynay

Patron
Messages
5,149
Location
West Coast, Singapore
this is my case:
Welcome to Thermaltake

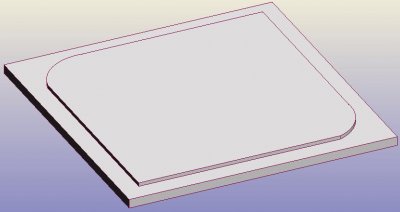
modding a big window in the top which is 350mmx350mm (LxW) now my school has a CAM (computer aided milling) so I was thinking of cutting the perspex in the traditional manner with the panel being stuck with silicone on the underside of the panel. But the catch comes here I will use the CAM to make the edges of the panel (the areas that would normally be hidden under the panel) 2 mm thinner then the original acrylic and leave the actual window area so the panel would have a inset of 2mm around the edge the panel then will be fitted with silicone thus making the window appear flush with the casing as the extra mm actually visible externally will counteract the 1mm thick metal casing plus silicone thickness

If you lost me on that heavy worded description here are some basic instructions I have set myself:

1. cut out acrylic larger then window
2. use a CAM (compter aided milling) to get exactly 2mm thinner on the edges of the panel which will be stuck under the panel in the traditional manner
3. place thicker area through window hole and check size
4. stick down with silicone in the traditional manner behind the panel but because of the milled indent outside of the window view the window will appear flush with the case as it will be 1mm thicker then the area glued

anybody attempted this then??? I can't be the first person in the world to think of it...............
 
I think I saw a case mod somewhere where somebody cut the acrylic to sit flush with the case. Is that what you're doing?
 
hey ive done alot of modding with car stereos and i think i can apply some knowledge to this as ive had problems making things fit flush due to not leaving enough tolerance. Ive also used a CAM machine in industry for part of a design course so this might help.

1mm thick metal case and the 1mm lower edges of the acrylic will potentially not sit as flush as you like for one main reason, this is as the silicone will be about 1mm thick also and thus the acrylic will be indented slightly i think from my experience with tolerances.

Two ways to counter act this are simple make the acrylic edge cut 2mm deep to allow 1mm for the metal case and 1mm for the silicone due to its thick density. In theory you might be able to get away with 1.5mm deep cut if you can set your milling machine to do that and then apply enough pressure with a flat plated press when siliconing the acrylic to the metal case as the more pressure the less dense the silicone will be between the two surfaces.

These are just my opinions though as ive never tried it i wouldn't know perfectly. I would however like to see the mass of programming codes you are going to use on the milling machine...

lol thanks I forgot about silicone thickness being a factor I think I will go with 2 and then place the case upside down on a flat table and put a large weight on to the acrylic so it is flush with the panel :D

will programming the milling machine really be that hard???? I was hoping that it would be simple as 30 or so lines saying this is sie of area needing to be cut down it needs to be 3mm thick (I am using 5mm acrylic) and the machine will work from there
 
Sounds like your sorted then with the large weight lol.
As far as programming goes then amount of lines will depend on the corners of the acrylic as if they are going to be cut circular then you will build up a large amount code in order to perform the cuts on the corners due to it only being able to move in the x/y parameters makes cutting circles code rich.

Well it should all go fine and coding can be made easy if your school has CNC software like my college does. Let me know how it turns out.
 
NO!!!!!!!! my panel is square in shape but two of the corners are rounded in to perfect circles which I use a rotary cutter for **** my outlandish use of rounded corners :(:( oh well I shall do it anyway although I have a feeling my job just got a lot more difficult
 
NO!!!!!!!! my panel is square in shape but two of the corners are rounded in to perfect circles which I use a rotary cutter for **** my outlandish use of rounded corners :(:( oh well I shall do it anyway although I have a feeling my job just got a lot more difficult

Rotary cutters in milling machines will make a little difference but not all that much as i stated before because the milling bit will have to move in code such as:
x=155 y=155, x=157 y=157, x=159 y=157

If you get that you will understand what i mean as im sure you do. The square corners will be easier but look at it from this point the rounded corners are going to look so much better than the square ones and will be so worth the wait for the extra programming time. Use a program like ProDesktop to make a model like the attached image and then use it to make the programming file from but im not to sure what programs ProDesktop will work with. Obviously that only took seconds for me to knock up and thats why it might look different cause i dont have all your dimensions and stuff lol, hope this helps though.
 

Attachments

  • salty.JPG
    salty.JPG
    28.8 KB · Views: 46
lol I have been trying to get to grips with google sketch up to no avail I haven't yet figured out how to draw my case on it let alone make curved corners and btw that image looks incredible except my window has the curved corners only on one side the other side is just normal 90 degrees :D
 
Well i was debating with myself when drawing it up whether the rounded corners were on a single side or opposite like i have drawn them lol. If you can get a copy of ProDesktop 2000i2, which is what i used for the image above, it will save you lots of time and is really easy to learn to use it. I learnt in about 3 hours and it has so much potential to make designs. I made my whole A level design product on it and it even allows for moving parts in the designs yay!
 
Status
Not open for further replies.
Back
Top Bottom