veg1992
Golden Master
- Messages
- 19,993
WinCustomize: How to Change Your Boot Screen
A. Introduction:
Basic tools:
- MS Windows: Preferably Win XP is the right system to work on for Bootskin.
- Bootskin: The actual program to create and apply Bootskins with ease and safety.
- Photoshop CS (either full or free trial version): This is where the main work is done.
- WinZip: The utility to zip your Bootskins. (you could also use winRAR as it is a better program)
- Notepad or Object Edit or any other text editor: Used to make the little script that comes with every Bootskin. (Notepad is intergraded to Windows so you donÂ’t need to download anything else).
The big picture:
To create a Bootskin you need to make-create three basic things:
a. The screen image: The actual image to show.
b. The progress bar: The tiny little bar that floats.
c. The script: A small text file that tells everything what to do.
B. The screen image:
- We will now attempt to make the screen image we want to use for our Bootskin. The whole process will take place in Adobe Photoshop CS. All terms referred are from the actual Photoshop layout.
- Screen imageÂ’s Properties: 640x480, 4-bit, 16 colors palette.
1. You need to make your image in 640x480, the resolution that any Bootskin screen image is. So if you have a bigger sized picture-wall you need to drop its resolution to 640x480. Appropriate wall sizes are: 800x600, 1024x768, 1280x960 and 1600x1200. If you have any other resolution you may need to do some clipping or stretch the image.
2. The way to do proper image resize is from the menu "Image>SizeÂ…" Upon click on it a Dialog Box will appear.
3. Tick all the check-boxes that appear on the lower part of the Dialog Box. Those are:
- Scale Styles (if you have a multilayered image and you used styles or blending options
on them to scale them as vector forms, gives them a cleaner look)
- Constrain Proportions (so that your image doesnÂ’t get hindered too much)
- Resample Image (the mode to resample your image). In the drop down menu next to
Resample Image select Bicubic; this is the best method to bring down an image.
4. Now at the text box labeled as Width insert the number 640. With Constrain Proportions activated the Height should adjust automatically to 480. Press Ok to resize.
5. If your image is not of the resolutions mentioned above, then donÂ’t click on Constrain Proportions and in the text boxed labeled as Width and Height insert the numbers 640 and 480 correspondingly. Press ok to resize. Note: This might alter image quality, but that is your choice.
Screenshot 1: In this first screenshot you can see steps 1-5:

6. Now you have the right size of image. The next you need to do is reduce the colors to the 4-bit palette or 16 colors.
7. The way to properly reduce the image color depth is to go from "Image>Mode>Indexed ColorÂ…" Indexing an image means that youÂ’ll reduce its colors to a specified number and all pixels will be accordingly adjusted. The largest possible palette when you Index an image is consisted of 256 colors. Note: Imagine the image palette as a big matrix of boxes each one representing a color of the image. Each box has a unique value. The first color in the palette is called the Master Color. (Note this for future reference, since itÂ’ll help you understand the relation between Screen Image and Progress Bar)
8. A property window will open. At this stage youÂ’ll need to play a bit with all the fields. Check the check-box called Preview in order to preview the changes to your image and in that way you may experiment freely. The following fields are the ones that appear in the window with short explanatory tips:
- Palette: The way the color will be applied to the image. You may select from three kinds which are: Local (Selective), Local (Perspective), Local (Adaptive). You choose the one that is best for your image. I recommend using mostly Local (Selective) or Local (Perspective) since they map colors better.
- Colors: The number of colors you want the image to be indexed in. Here you just type the number 16, since this is the value for 4-bit images.
- Forced: The number of colors forced to be as default first colors in the palette. Here I recommend choosing Black & White, since these are the primary colors needed for the picture. (If you are an advanced user you may choose None or Custom).
- There is a check-box called Transparency. Do not check it, as itÂ’ll ruin your work. The Windows system doesnÂ’t recognize Transparency for system images, basically there is no transparency for 4-bit images at all. It is a feature for 256 colors images and beyond.
- The Matte drop-down list may be active or inactive, I donÂ’t know what it is supposed to do, but youÂ’d better not touch it and leave it as is.
- Dither: It has four different methods to dither the image. You may play with them freely and adjust it to your image needs. I recommend dithering with Diffusion.
- Amount: The amount of the applied dithering method. Usually is only active for Diffusion. I recommend setting it to about 85-95% for Diffusion.
- Also there is a check-box at the lower part of the Dialog Box labeled "Preserve Exact Colors". Do not check this as itÂ’ll also ruin your work. Preserving colors is only possible for 256 colors or above images.
- After you bring the image to your liking Press Ok to apply changes. Note: Not all images look good in 16 colors. See the tips area below for more info as to the selection of images.
Screenshot 2: In this screenshot you can see steps 6-8:
\

9. Now youÂ’ll need to save the images palette as youÂ’ll need it to make a matching progress bar.
10. To save your imageÂ’s palette file go to "Image>Mode>Color TableÂ…"
11. A property windows will open. In front of you is the palette of your image. Press Save and save the palette somewhere in your drive. Note: You may notice that the palettes are saved as .atn or .act (depends on your PhotoshopÂ’s Edition), those are action files, a collection of macros to perform various actions in Photoshop.
Screenshot 3: In this screenshot you can see steps 9-11:

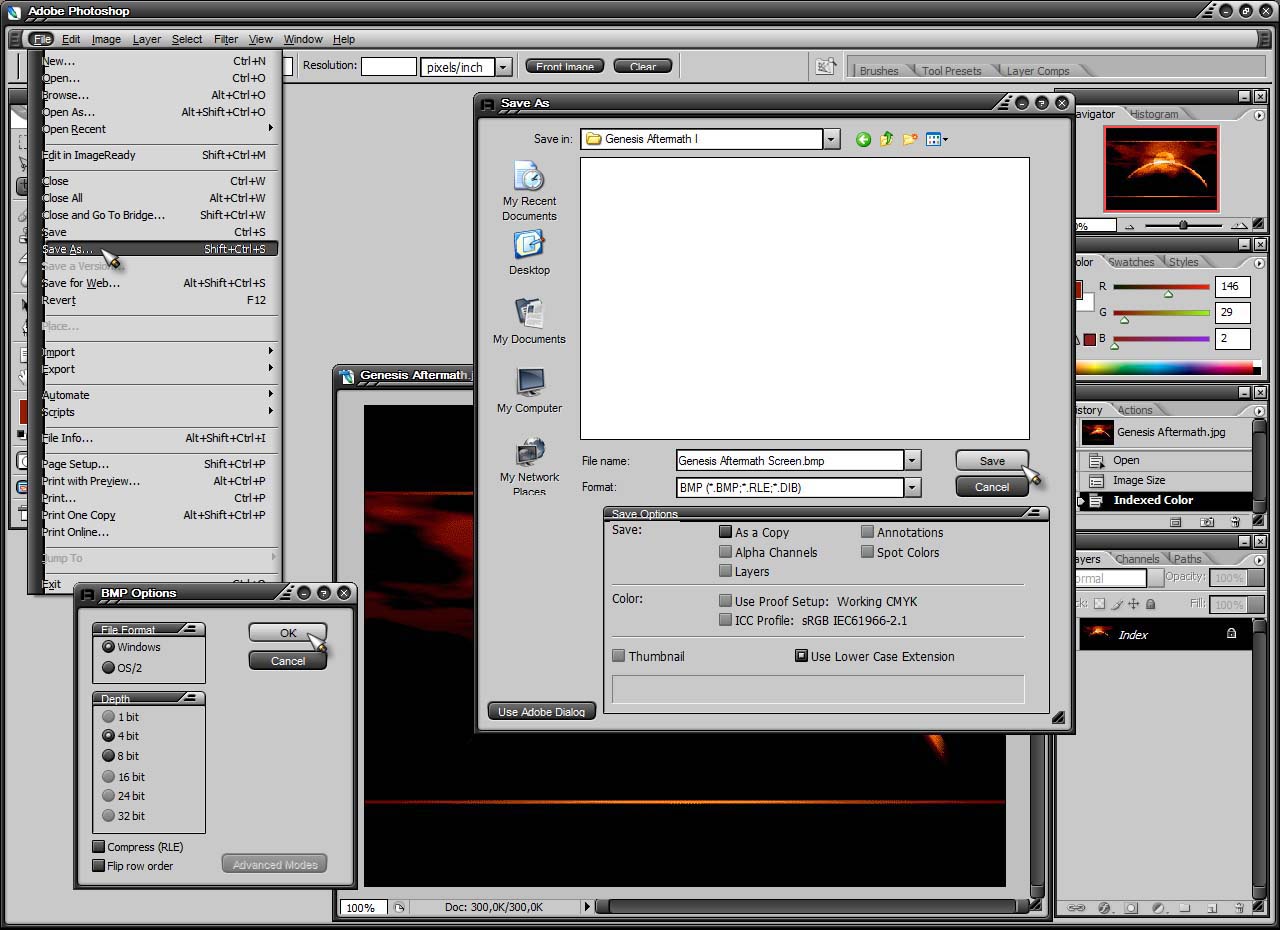
12. Now you need to save the screen image. To do that go to File>Save AsÂ… and from the format drop-down list select .bmp. Give your image a name and hit the Save button. A properties window will come up. From that select 4-bit (donÂ’t leave the default 8-bit value) and donÂ’t select any of the boxes below.
C. The progress bar:
- We will now attempt to make the progress bar image we want to use for our Bootskin. The whole process will take place in Adobe Photoshop CS. All terms referred are from the actual Photoshop layout.
- Screen imageÂ’s Properties: 22x9, 4-bit, 16 colors palette.
1. You need to make your image in 22x9, the resolution that any Bootskin proper progress bar image is.
2. Paint the progress bar black with the bucket tool and reduce the colors to the 4-bit palette or 16 colors.
3. The way to properly reduce the image color depth is to go from "Image>Mode>Indexed ColorÂ…" Indexing an image means that youÂ’ll reduce its colors to a specified number and all pixels will be accordingly adjusted. The largest possible palette when you Index an image is consisted of 256 colors. Note: Imagine the image palette as a big matrix of boxes each one representing a color of the image. Each box has a unique value. The first color in the palette is called the Master Color. (Note this for future reference, since itÂ’ll help you understand the relation between Screen Image and Progress Bar)
4. A property window will open. At this stage you wonÂ’t need to play with any fields. Just leave them as they are and hit the ok button.
Screenshot 5: In this screenshot you can see steps 1-4:

5. Now you need to have the progress bar with the same kind of palette you used with your screen image. That is why you saved your original images palette.
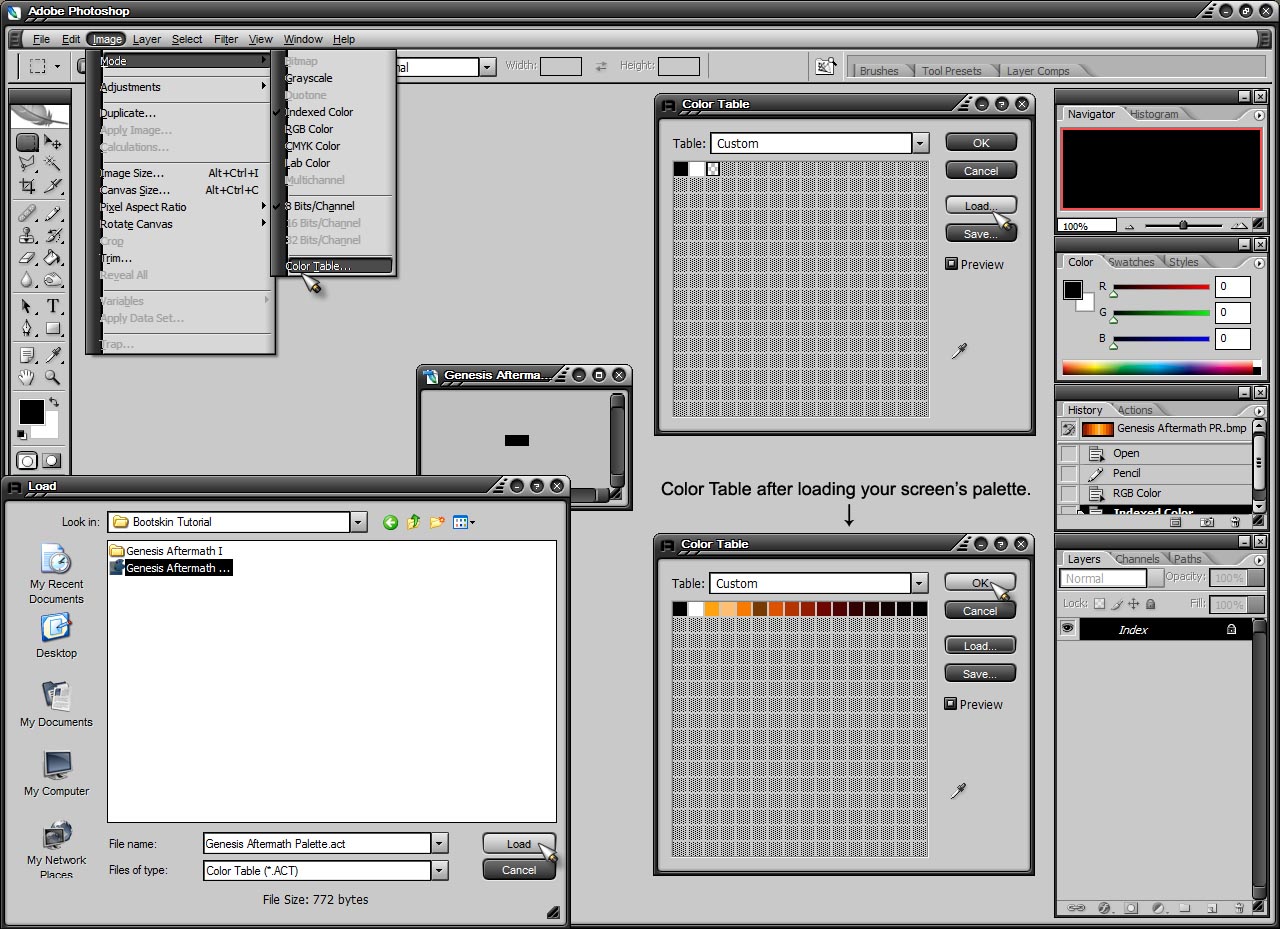
6. To load your screenÂ’s image palette go to "Image>Mode>Color TableÂ…"
7. A property windows will open. In front of you is the palette of your image with only 2 or 3 colors. Press Load and find your screen imageÂ’s palette you previously saved somewhere in your drive and hit ok. Now youÂ’ll see that you have the identical palette as your screen image. Note: You may notice that the palettes are saved as .atn or .act (depends on your PhotoshopÂ’s Edition, those are action files, a collection of macros to perform various actions in Photoshop.
Screenshot 6: In this screenshot you can see steps 5-7:
. Time to move on to the actual progress image processing. First you open your screen image to use as a color chooser. It is the best, safest and fastest way since you donÂ’t know the exact values of colors from your Color Table.
9. Pick color chooser and start picking the colors youÂ’ll need for the progress bar image. Using the pencil tool draw your progress bar at any kind of design you like. For your convenience you may want to zoom to 1600% to be more precise as the progress bar is a very small image.
Screenshot 7: In this screenshot you can see steps 8-9:

10. Now you need to save the progress bar image. To do that go to File>Save AsÂ… and from the format drop-down list select .bmp. Give your image a name and hit the Save button. A properties window will come up. From that select 4-bit (donÂ’t leave the default 8-bit value) and donÂ’t select any of the boxes below. It is suggested to save the progress bar image in the same directory with the screen image.
Screenshot 8: In this screenshot you can see step 10:
http://album.wincustomize.com/image...HT6HXKF33inIi28qrrOjBIV9dc/Zu9W+78xUWyPdIDm4H
D. The script:
- We will now attempt to make the script we want to use for our Bootskin. The whole process will take place in Notepad or Object Edit and MS Paint.
- ScriptÂ’s Properties: File type of .ini.
1. The actual script is very simple. It consists of ten lines of properties code.
2. You open Notepad or Object Edit and write down the following code or copy/paste it exactly as given:
[BootSkin]
Type=
Name= ""
Author= ""
Description= ""
Screen=
ProgressBar=
ProgressBarX=
ProgressBarY=
ProgressBarWidth=
3. Explanatory guide for each field:
- [Bootskin] : This indicates for which program is the code for.
- Type= : IÂ’m not sure what is the use for this. But the value is always 0.
- Name= "" : Within the quotation marks you put the name of your skin.
- Author= "" : Within the quotation marks you put the name of the creator/your name.
- Description= "" : Within the quotation marks you write down a brief description for your skin.
- Screen= : This is where you write down your screen imageÂ’s filename.
- ProgressBar= : This is where you write down your progress bar imageÂ’s filename.
- ProgressBarX= : The x-value where the right top angle of your progress bar imageÂ’s will be placed. This is a value that tells at which x-pixel of the screen image will the progress bar be placed. Note: x-y are used as in a graphical histogram.
- ProgressBarY = : The y-value where the right top angle of your progress bar imageÂ’s will be placed. This is a value that tells at which y-pixel of the screen image will the progress bar be placed. Note: x-y are used as in a graphical histogram.
- ProgressBarWidth = : The width that you wish your progress bar to be. Note: This is not the progress bar imageÂ’s width (22 pixels) but the distance you want your progress bar image to travel within the picture.
4. Example of complete script for better understanding:
[BootSkin]
Type= 0
Name= "Genesis Aftermath"
Author= "Cyberworld"
Description= "At the dawn of the new light..."
Screen= Genesis Aftermath Screen.bmp
ProgressBar= Genesis Aftermath Progress Bar.bmp
ProgressBarX= 115
ProgressBarY= 436
ProgressBarWidth= 475
5. You might have some trouble figuring out the x/y values as well as the progress bar width. So the easiest way to resolve this is via MS Paint. Open both your screen and progress bar images. On your progress bar image hit Ctrl+A to select the whole image and then Ctrl+C to Copy the image to the clipboard. Now on your screen image hit Ctrl+V to paste the progress bar image within it. YouÂ’ll notice that the progress image floats within the screen image and you can move it all around the image. I recommend that you already zoom into the area where youÂ’d like your progress bar to start from prior to pasting the progress bar image. Place your cursor just one pixel above the area selected and see at the lower right part of MS Paint a place where some numbers appear. Those are the mouse coordinates the exact x-y values you need for your script. After that use the selection tool to draw a rectangle starting from the x-value of your progress bar image and pull it to a satisfying progress bar width. Again at the lower right part of MS Paint another set of numbers will appear stating the width and height of your rectangle. The first one is the width and the actual progress bar width value you need for your script.
Screenshot 9: In this screenshot you can see step 5:

6. When the script is ready save it as "bootskin.ini" from Notepad or Object Edit in the same directory with your screen and progress bar images.
E. Compiling the Bootskin:
1. This is the less recommended way to compile a .bootskin, yet it is the fastest and up to now the most efficient for me. Go to the directory where your screen and progress images are, as well as your bootskin.ini and select them all. Using WinZip or any other zipper program zip the three files into one .zip file. After this just rename the .zip to .bootskin and double-click it. The .bootskin file will auto-install to your bootskin directory.
2. ThatÂ’s all. Your bootskin is ready.
A. Introduction:
Basic tools:
- MS Windows: Preferably Win XP is the right system to work on for Bootskin.
- Bootskin: The actual program to create and apply Bootskins with ease and safety.
- Photoshop CS (either full or free trial version): This is where the main work is done.
- WinZip: The utility to zip your Bootskins. (you could also use winRAR as it is a better program)
- Notepad or Object Edit or any other text editor: Used to make the little script that comes with every Bootskin. (Notepad is intergraded to Windows so you donÂ’t need to download anything else).
The big picture:
To create a Bootskin you need to make-create three basic things:
a. The screen image: The actual image to show.
b. The progress bar: The tiny little bar that floats.
c. The script: A small text file that tells everything what to do.
B. The screen image:
- We will now attempt to make the screen image we want to use for our Bootskin. The whole process will take place in Adobe Photoshop CS. All terms referred are from the actual Photoshop layout.
- Screen imageÂ’s Properties: 640x480, 4-bit, 16 colors palette.
1. You need to make your image in 640x480, the resolution that any Bootskin screen image is. So if you have a bigger sized picture-wall you need to drop its resolution to 640x480. Appropriate wall sizes are: 800x600, 1024x768, 1280x960 and 1600x1200. If you have any other resolution you may need to do some clipping or stretch the image.
2. The way to do proper image resize is from the menu "Image>SizeÂ…" Upon click on it a Dialog Box will appear.
3. Tick all the check-boxes that appear on the lower part of the Dialog Box. Those are:
- Scale Styles (if you have a multilayered image and you used styles or blending options
on them to scale them as vector forms, gives them a cleaner look)
- Constrain Proportions (so that your image doesnÂ’t get hindered too much)
- Resample Image (the mode to resample your image). In the drop down menu next to
Resample Image select Bicubic; this is the best method to bring down an image.
4. Now at the text box labeled as Width insert the number 640. With Constrain Proportions activated the Height should adjust automatically to 480. Press Ok to resize.
5. If your image is not of the resolutions mentioned above, then donÂ’t click on Constrain Proportions and in the text boxed labeled as Width and Height insert the numbers 640 and 480 correspondingly. Press ok to resize. Note: This might alter image quality, but that is your choice.
Screenshot 1: In this first screenshot you can see steps 1-5:
6. Now you have the right size of image. The next you need to do is reduce the colors to the 4-bit palette or 16 colors.
7. The way to properly reduce the image color depth is to go from "Image>Mode>Indexed ColorÂ…" Indexing an image means that youÂ’ll reduce its colors to a specified number and all pixels will be accordingly adjusted. The largest possible palette when you Index an image is consisted of 256 colors. Note: Imagine the image palette as a big matrix of boxes each one representing a color of the image. Each box has a unique value. The first color in the palette is called the Master Color. (Note this for future reference, since itÂ’ll help you understand the relation between Screen Image and Progress Bar)
8. A property window will open. At this stage youÂ’ll need to play a bit with all the fields. Check the check-box called Preview in order to preview the changes to your image and in that way you may experiment freely. The following fields are the ones that appear in the window with short explanatory tips:
- Palette: The way the color will be applied to the image. You may select from three kinds which are: Local (Selective), Local (Perspective), Local (Adaptive). You choose the one that is best for your image. I recommend using mostly Local (Selective) or Local (Perspective) since they map colors better.
- Colors: The number of colors you want the image to be indexed in. Here you just type the number 16, since this is the value for 4-bit images.
- Forced: The number of colors forced to be as default first colors in the palette. Here I recommend choosing Black & White, since these are the primary colors needed for the picture. (If you are an advanced user you may choose None or Custom).
- There is a check-box called Transparency. Do not check it, as itÂ’ll ruin your work. The Windows system doesnÂ’t recognize Transparency for system images, basically there is no transparency for 4-bit images at all. It is a feature for 256 colors images and beyond.
- The Matte drop-down list may be active or inactive, I donÂ’t know what it is supposed to do, but youÂ’d better not touch it and leave it as is.
- Dither: It has four different methods to dither the image. You may play with them freely and adjust it to your image needs. I recommend dithering with Diffusion.
- Amount: The amount of the applied dithering method. Usually is only active for Diffusion. I recommend setting it to about 85-95% for Diffusion.
- Also there is a check-box at the lower part of the Dialog Box labeled "Preserve Exact Colors". Do not check this as itÂ’ll also ruin your work. Preserving colors is only possible for 256 colors or above images.
- After you bring the image to your liking Press Ok to apply changes. Note: Not all images look good in 16 colors. See the tips area below for more info as to the selection of images.
Screenshot 2: In this screenshot you can see steps 6-8:
\
9. Now youÂ’ll need to save the images palette as youÂ’ll need it to make a matching progress bar.
10. To save your imageÂ’s palette file go to "Image>Mode>Color TableÂ…"
11. A property windows will open. In front of you is the palette of your image. Press Save and save the palette somewhere in your drive. Note: You may notice that the palettes are saved as .atn or .act (depends on your PhotoshopÂ’s Edition), those are action files, a collection of macros to perform various actions in Photoshop.
Screenshot 3: In this screenshot you can see steps 9-11:
12. Now you need to save the screen image. To do that go to File>Save AsÂ… and from the format drop-down list select .bmp. Give your image a name and hit the Save button. A properties window will come up. From that select 4-bit (donÂ’t leave the default 8-bit value) and donÂ’t select any of the boxes below.
C. The progress bar:
- We will now attempt to make the progress bar image we want to use for our Bootskin. The whole process will take place in Adobe Photoshop CS. All terms referred are from the actual Photoshop layout.
- Screen imageÂ’s Properties: 22x9, 4-bit, 16 colors palette.
1. You need to make your image in 22x9, the resolution that any Bootskin proper progress bar image is.
2. Paint the progress bar black with the bucket tool and reduce the colors to the 4-bit palette or 16 colors.
3. The way to properly reduce the image color depth is to go from "Image>Mode>Indexed ColorÂ…" Indexing an image means that youÂ’ll reduce its colors to a specified number and all pixels will be accordingly adjusted. The largest possible palette when you Index an image is consisted of 256 colors. Note: Imagine the image palette as a big matrix of boxes each one representing a color of the image. Each box has a unique value. The first color in the palette is called the Master Color. (Note this for future reference, since itÂ’ll help you understand the relation between Screen Image and Progress Bar)
4. A property window will open. At this stage you wonÂ’t need to play with any fields. Just leave them as they are and hit the ok button.
Screenshot 5: In this screenshot you can see steps 1-4:
5. Now you need to have the progress bar with the same kind of palette you used with your screen image. That is why you saved your original images palette.
6. To load your screenÂ’s image palette go to "Image>Mode>Color TableÂ…"
7. A property windows will open. In front of you is the palette of your image with only 2 or 3 colors. Press Load and find your screen imageÂ’s palette you previously saved somewhere in your drive and hit ok. Now youÂ’ll see that you have the identical palette as your screen image. Note: You may notice that the palettes are saved as .atn or .act (depends on your PhotoshopÂ’s Edition, those are action files, a collection of macros to perform various actions in Photoshop.
Screenshot 6: In this screenshot you can see steps 5-7:
. Time to move on to the actual progress image processing. First you open your screen image to use as a color chooser. It is the best, safest and fastest way since you donÂ’t know the exact values of colors from your Color Table.
9. Pick color chooser and start picking the colors youÂ’ll need for the progress bar image. Using the pencil tool draw your progress bar at any kind of design you like. For your convenience you may want to zoom to 1600% to be more precise as the progress bar is a very small image.
Screenshot 7: In this screenshot you can see steps 8-9:
10. Now you need to save the progress bar image. To do that go to File>Save AsÂ… and from the format drop-down list select .bmp. Give your image a name and hit the Save button. A properties window will come up. From that select 4-bit (donÂ’t leave the default 8-bit value) and donÂ’t select any of the boxes below. It is suggested to save the progress bar image in the same directory with the screen image.
Screenshot 8: In this screenshot you can see step 10:
http://album.wincustomize.com/image...HT6HXKF33inIi28qrrOjBIV9dc/Zu9W+78xUWyPdIDm4H
D. The script:
- We will now attempt to make the script we want to use for our Bootskin. The whole process will take place in Notepad or Object Edit and MS Paint.
- ScriptÂ’s Properties: File type of .ini.
1. The actual script is very simple. It consists of ten lines of properties code.
2. You open Notepad or Object Edit and write down the following code or copy/paste it exactly as given:
[BootSkin]
Type=
Name= ""
Author= ""
Description= ""
Screen=
ProgressBar=
ProgressBarX=
ProgressBarY=
ProgressBarWidth=
3. Explanatory guide for each field:
- [Bootskin] : This indicates for which program is the code for.
- Type= : IÂ’m not sure what is the use for this. But the value is always 0.
- Name= "" : Within the quotation marks you put the name of your skin.
- Author= "" : Within the quotation marks you put the name of the creator/your name.
- Description= "" : Within the quotation marks you write down a brief description for your skin.
- Screen= : This is where you write down your screen imageÂ’s filename.
- ProgressBar= : This is where you write down your progress bar imageÂ’s filename.
- ProgressBarX= : The x-value where the right top angle of your progress bar imageÂ’s will be placed. This is a value that tells at which x-pixel of the screen image will the progress bar be placed. Note: x-y are used as in a graphical histogram.
- ProgressBarY = : The y-value where the right top angle of your progress bar imageÂ’s will be placed. This is a value that tells at which y-pixel of the screen image will the progress bar be placed. Note: x-y are used as in a graphical histogram.
- ProgressBarWidth = : The width that you wish your progress bar to be. Note: This is not the progress bar imageÂ’s width (22 pixels) but the distance you want your progress bar image to travel within the picture.
4. Example of complete script for better understanding:
[BootSkin]
Type= 0
Name= "Genesis Aftermath"
Author= "Cyberworld"
Description= "At the dawn of the new light..."
Screen= Genesis Aftermath Screen.bmp
ProgressBar= Genesis Aftermath Progress Bar.bmp
ProgressBarX= 115
ProgressBarY= 436
ProgressBarWidth= 475
5. You might have some trouble figuring out the x/y values as well as the progress bar width. So the easiest way to resolve this is via MS Paint. Open both your screen and progress bar images. On your progress bar image hit Ctrl+A to select the whole image and then Ctrl+C to Copy the image to the clipboard. Now on your screen image hit Ctrl+V to paste the progress bar image within it. YouÂ’ll notice that the progress image floats within the screen image and you can move it all around the image. I recommend that you already zoom into the area where youÂ’d like your progress bar to start from prior to pasting the progress bar image. Place your cursor just one pixel above the area selected and see at the lower right part of MS Paint a place where some numbers appear. Those are the mouse coordinates the exact x-y values you need for your script. After that use the selection tool to draw a rectangle starting from the x-value of your progress bar image and pull it to a satisfying progress bar width. Again at the lower right part of MS Paint another set of numbers will appear stating the width and height of your rectangle. The first one is the width and the actual progress bar width value you need for your script.
Screenshot 9: In this screenshot you can see step 5:
6. When the script is ready save it as "bootskin.ini" from Notepad or Object Edit in the same directory with your screen and progress bar images.
E. Compiling the Bootskin:
1. This is the less recommended way to compile a .bootskin, yet it is the fastest and up to now the most efficient for me. Go to the directory where your screen and progress images are, as well as your bootskin.ini and select them all. Using WinZip or any other zipper program zip the three files into one .zip file. After this just rename the .zip to .bootskin and double-click it. The .bootskin file will auto-install to your bootskin directory.
2. ThatÂ’s all. Your bootskin is ready.